Open Scholar Upload Image Unable to Process Request
Production and Publication
With the completion of the Copyediting stage, the submission now moves to Production. From here, the copyedited files will be converted to publishable formats in the class of galley files (e.g., PDF, HTML) and proofread before publishing. A new periodical issue will exist created and the article will be scheduled for publication in the outcome. This chapter explains the steps in that process, every bit well as how to utilize the versioning characteristic (beginning introduced in OJS 3.2) to publish a new version of an commodity if pregnant changes are fabricated.
OJS also offers a straightforward way to bypass the editorial workflow described in the previous chapter and submit content directly into production, where it can be added to an issue and published. You can practise this via Quick Submit plugin. See the detailed Quick Submit plugin instructions under the Data Import & Export chapter.
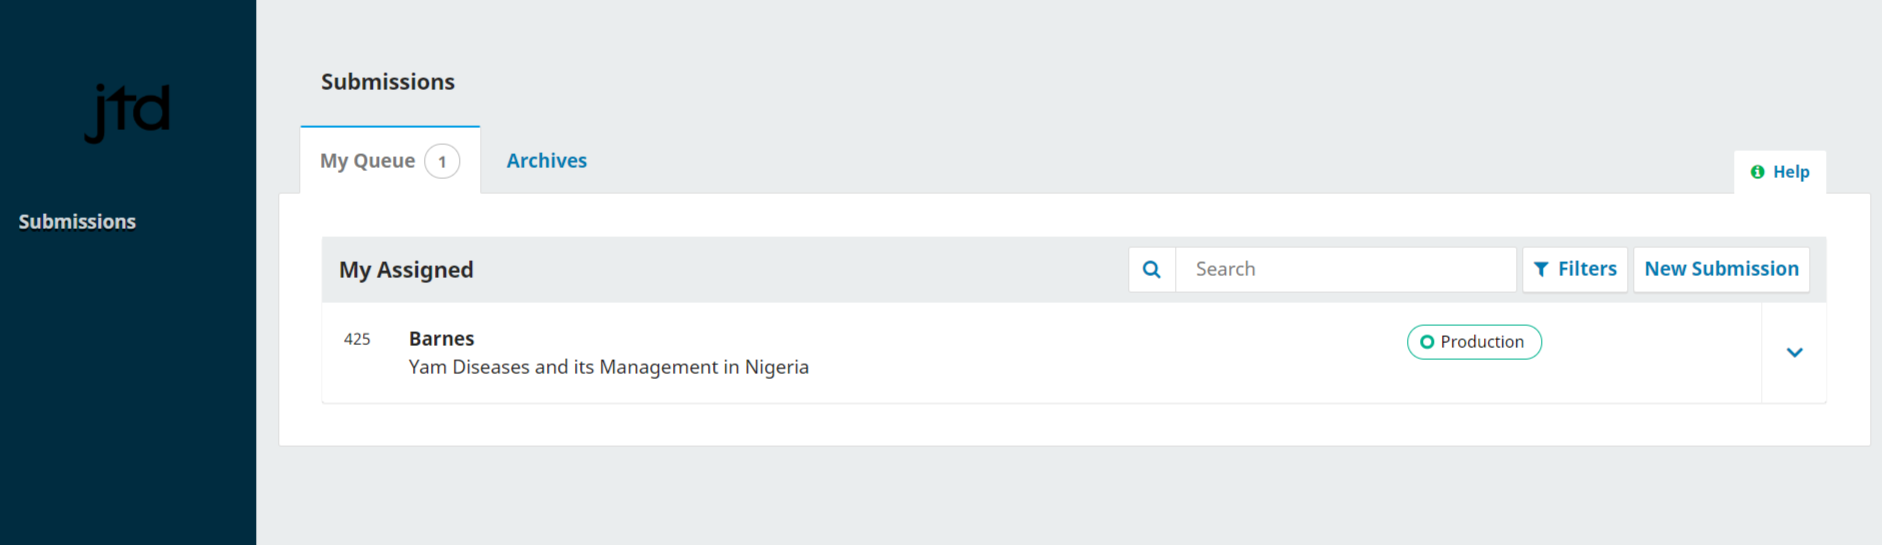
To first working in Production, the Section Editor or Journal Editor must login to the system and choose the submission from their dashboard.
Clicking on the article will open the submission record.
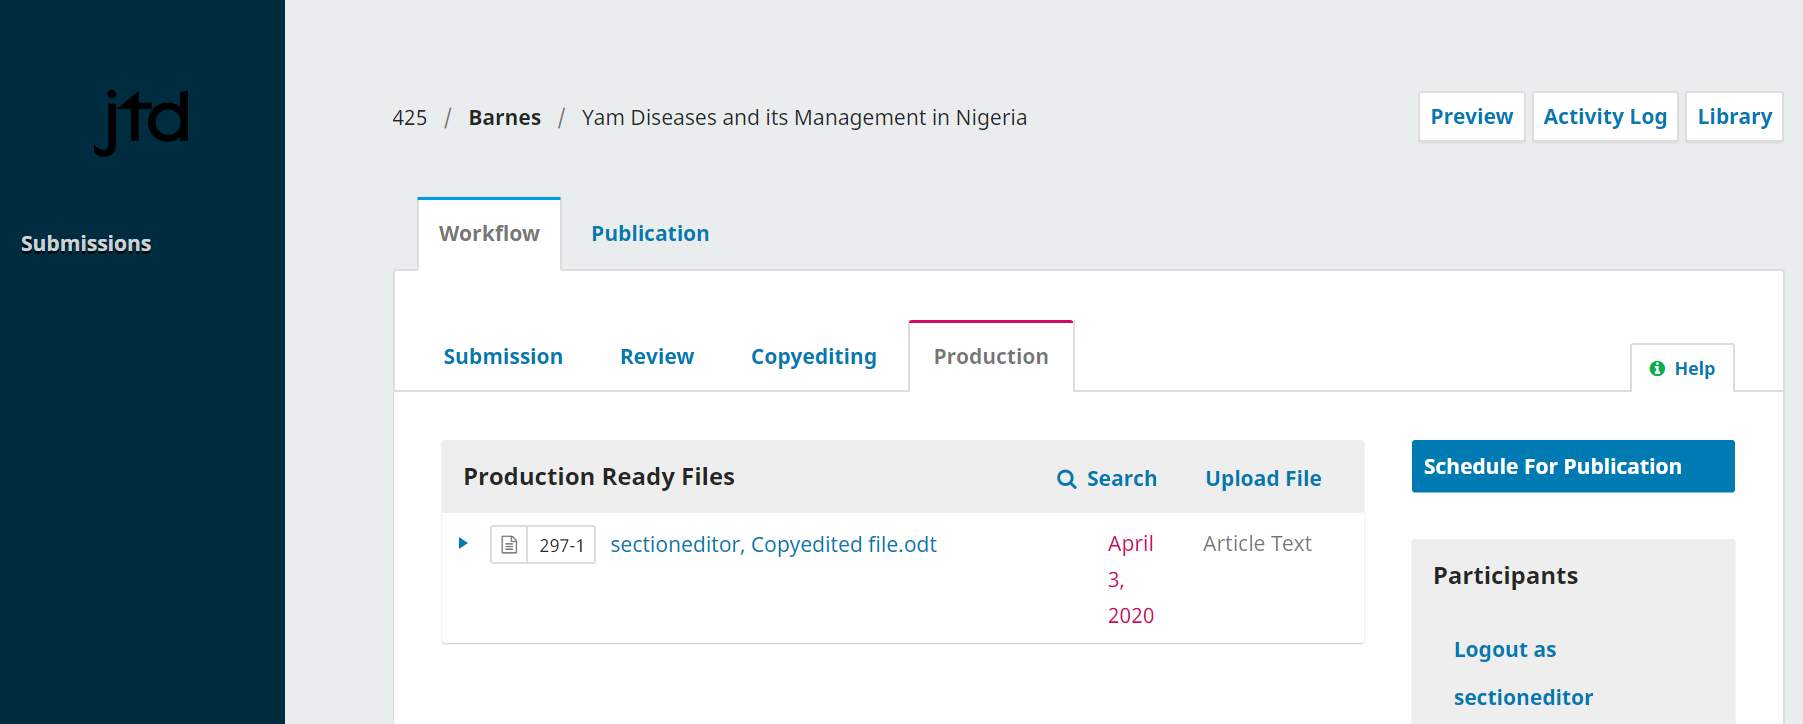
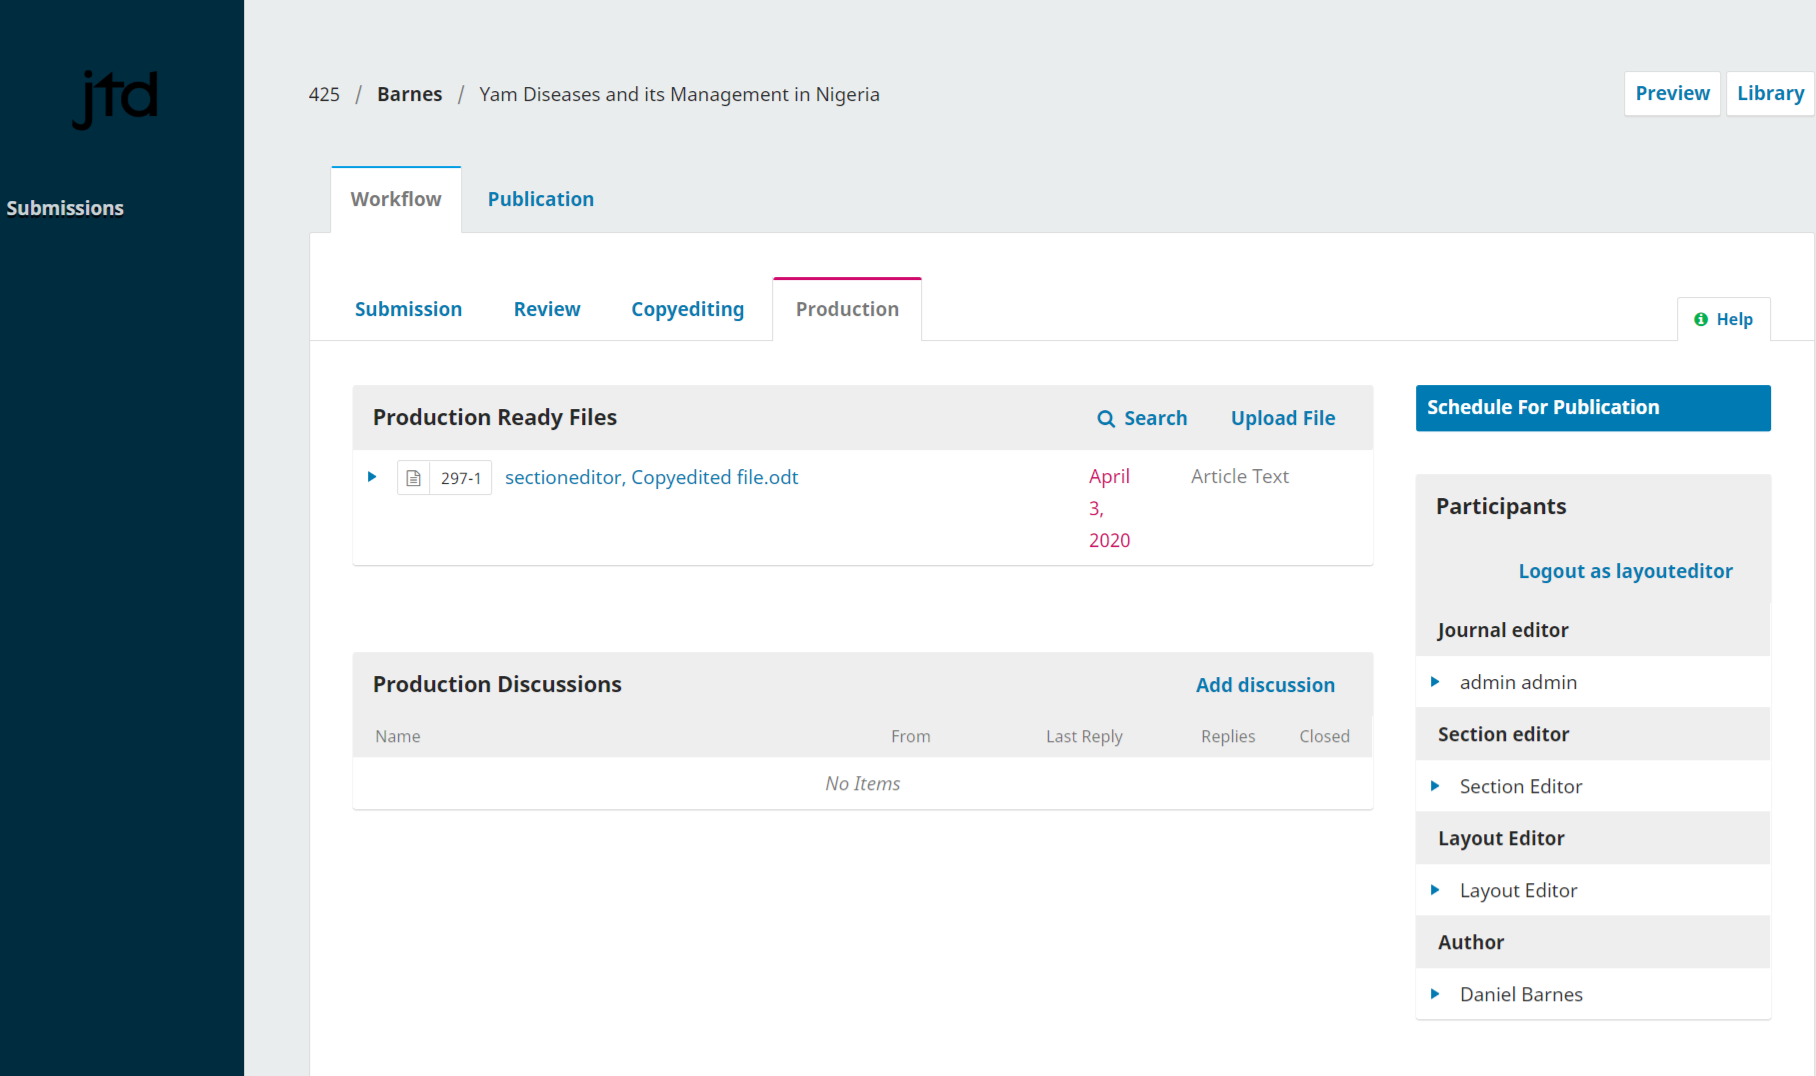
Yous volition see the copyedited files are now available in the Production Set up Files console.
In the Production tab, y'all can assign participants (such equally a Layout Editor) to the Product stage of the workflow and communicate with participants in the Production Discussions console.
This PKP School video explains the steps the Department Editor, Product Editor and/or Designer will take in the Production stage and the Publication tab. To lookout man other videos in this serial, visit PKP'due south YouTube channel.
Publication Tabs #
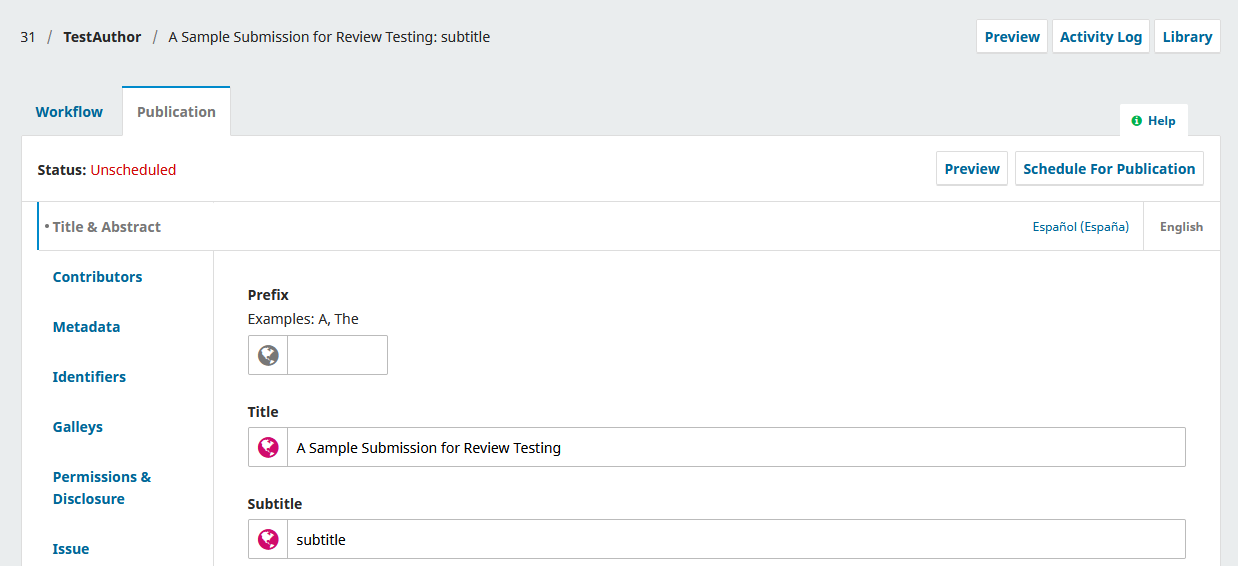
Everything related to publishing a submission is washed under the Publication tab. The Publication tab allows yous to edit or add together information almost the submission, including contributors, metadata, and identifiers. It is besides where yous volition upload the final Galley files for publication in the journal.
Here is an overview of what the different tabs in this section are for. Detailed instructions on some of these are available later on in the chapter.
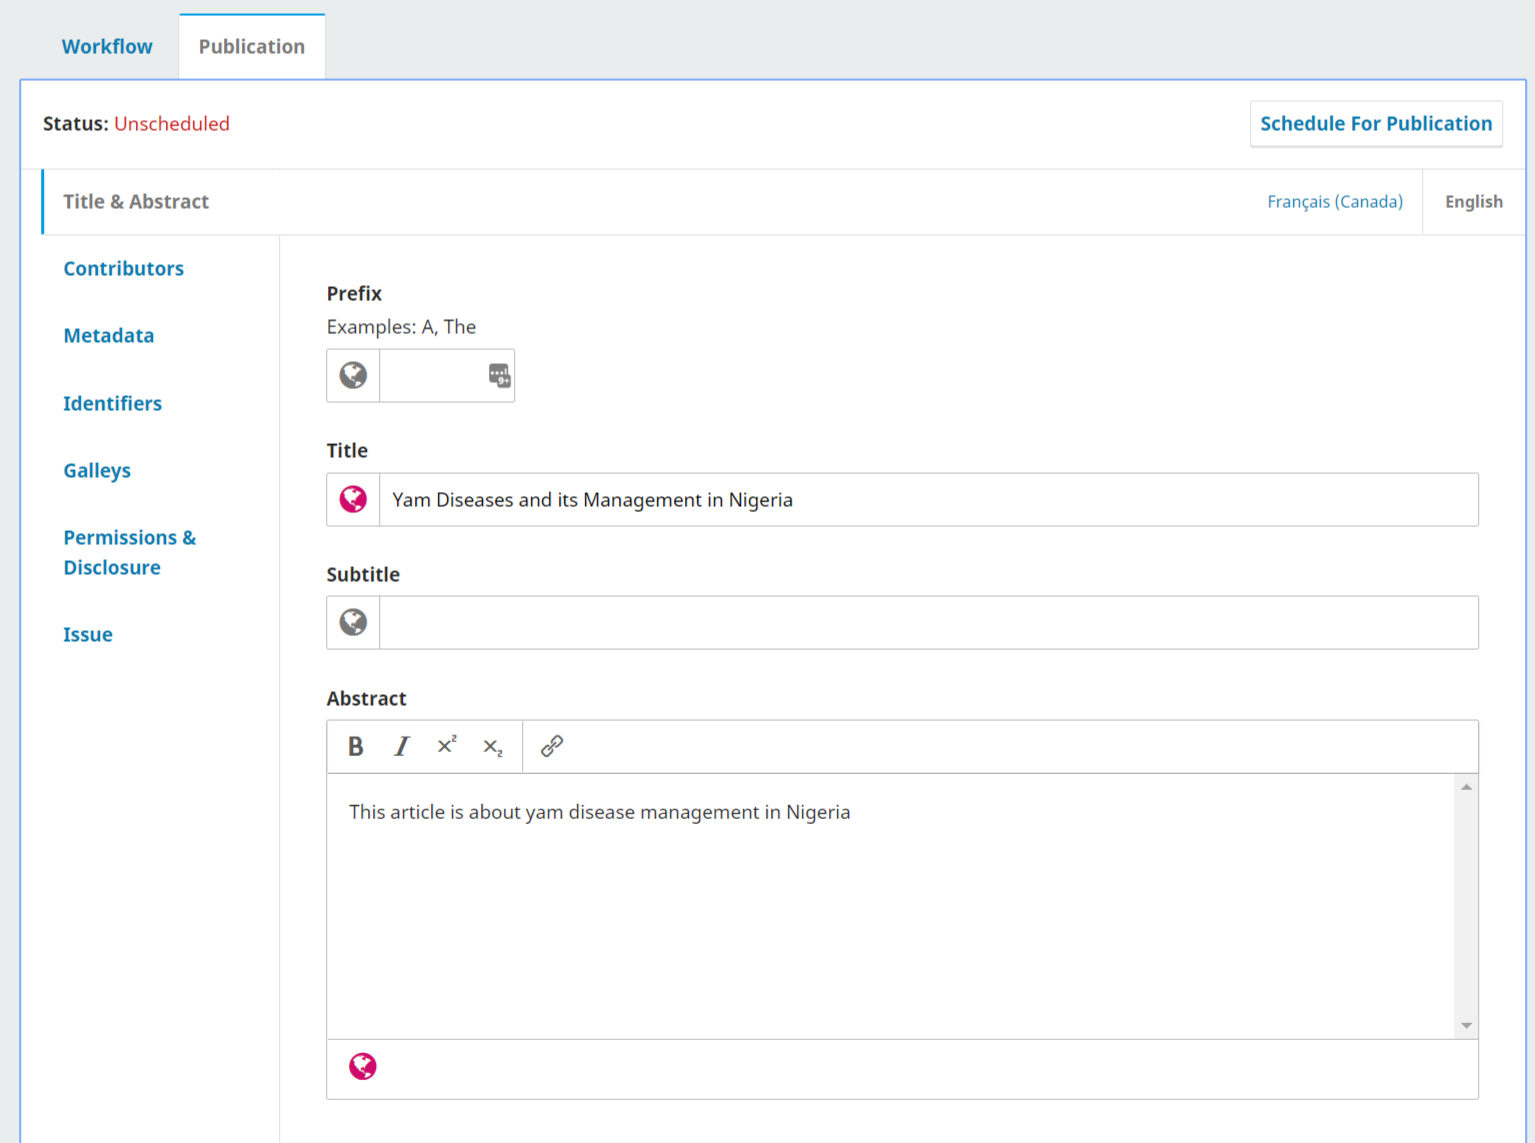
Title & Abstract Use this tab to edit the article title, subtitle, and abstract.
If any changes are made, click Salvage before exiting this window.
Contributors Utilise this tab to add, edit, or remove article contributors.
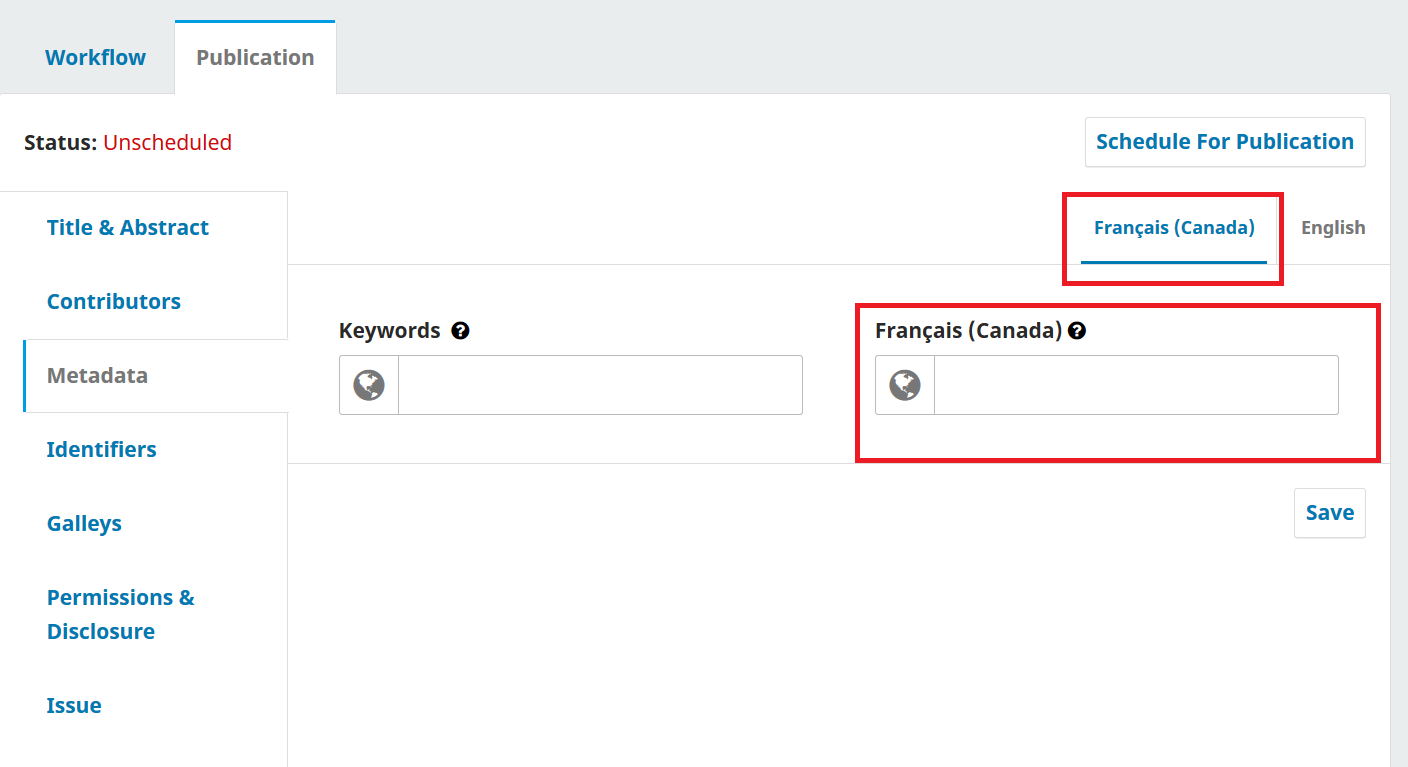
Metadata Use this tab to add or edit article keywords.
If any changes are made, click Relieve earlier exiting this window.
Identifiers Use the Identifiers tab to view or add a unique identifier, such as a DOI. More than information most assigning and managing DOIs is available in the DOI Plugin Guide.
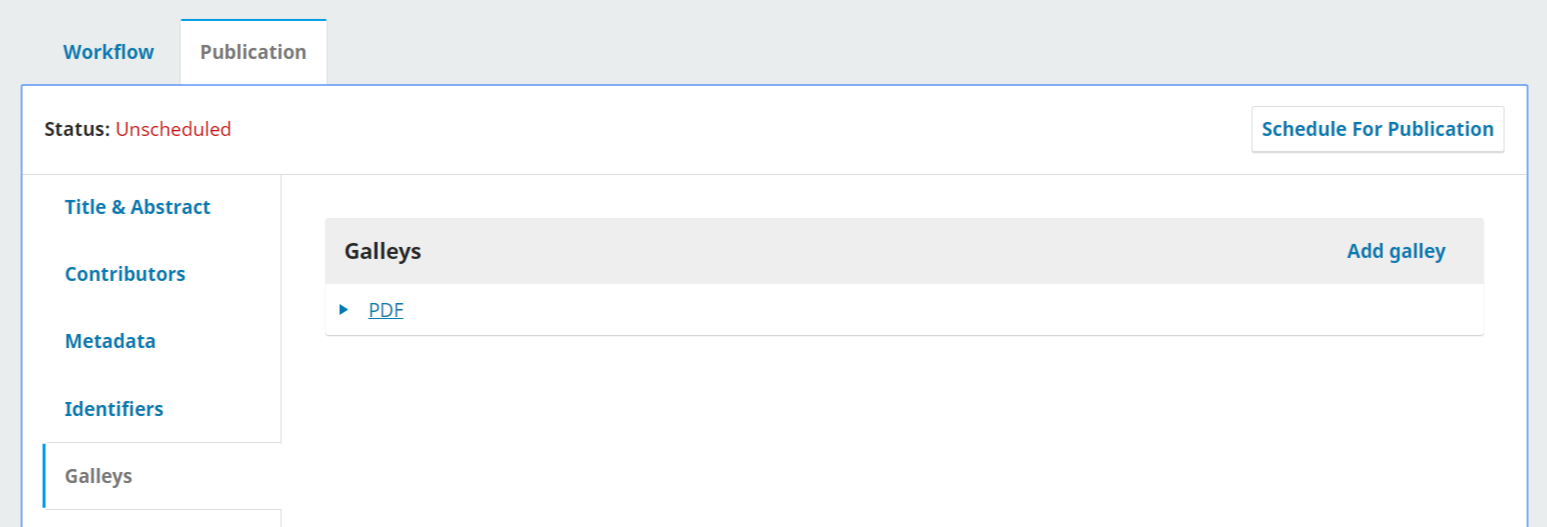
Galleys Utilise the Galleys tab to upload the final file for publication. This is explained below.
Permissions & Disclosure Include details near the copyright holder and link to the article license, if applicable. This will be automatically filled in according to your Distribution Settings.
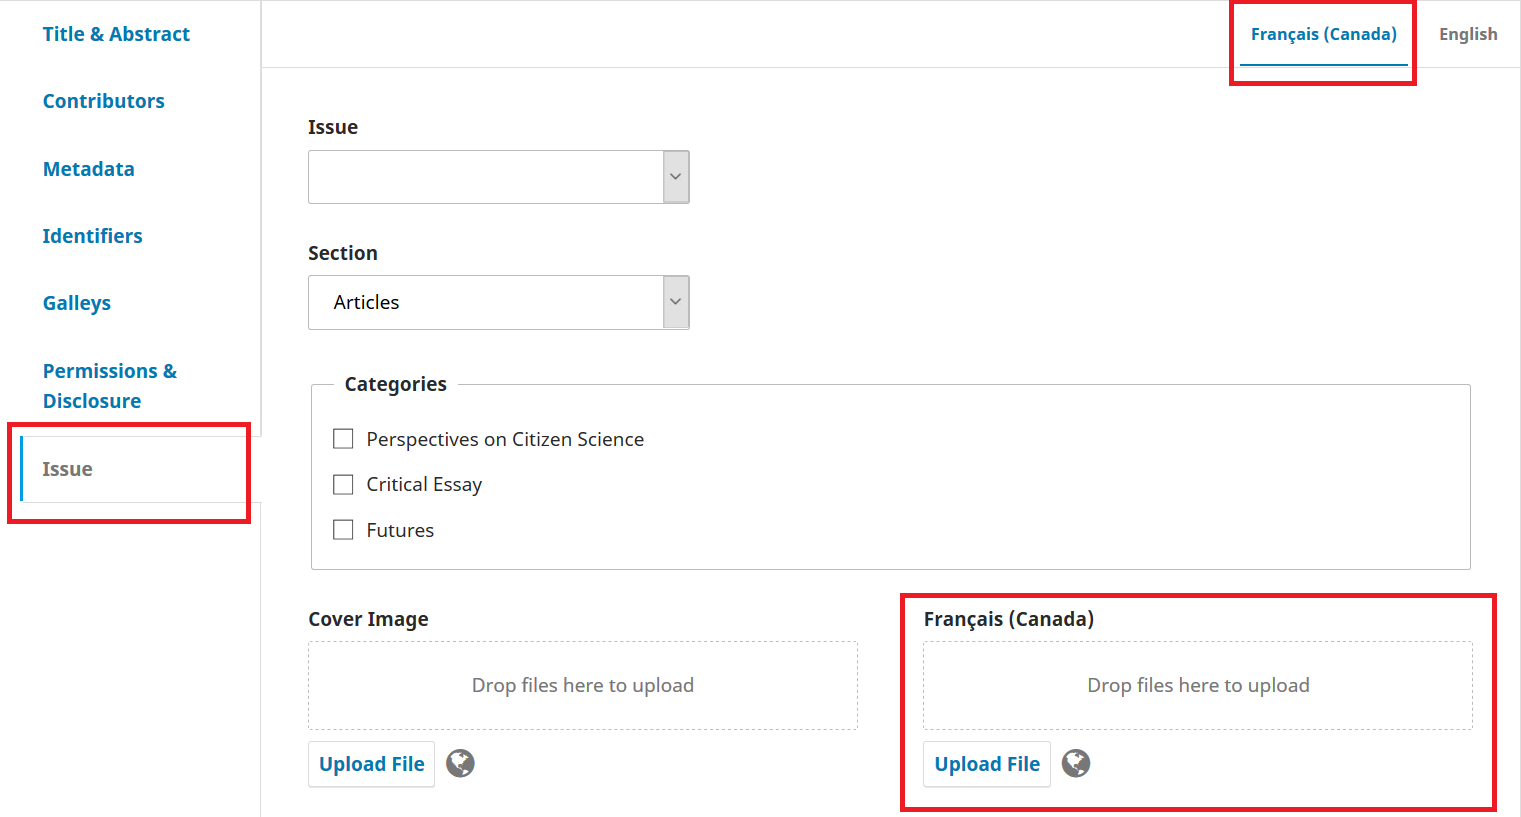
Issues Utilise the Issues tab to assign the article to a journal issue. This is explained below.
Multilingual Submissions #
The Championship & Abstract, Metadata, Permissions & Disclosure, and Issue tabs accept options for adding and editing metadata in multiple languages. Languages must first be turned on in Website Settings -> Setup -> Languages.
Select the desired linguistic communication tab below the "Schedule for Production" button, and complete the metadata fields in the selected language.
The "Result" tab allows you to upload multiple cover images in selected languages.
Format Article for Publication #
Assign Layout Editor #
A notification banner indicates that yous must assign someone to create the galley files (due east.g., the PDFs, HTML, etc.) from the product set files.
This can vary from journal to journal – y'all may have layout editors or production administration to do this work. Some journals utilize an external graphic design or typesetting service. If you lot would like to communicate with your layout editor, production assistant, graphic designer, or typesetter through OJS and manage the production process with them in OJS, ensure they have a user business relationship and add together them as a participant to the submission.
To make the assignment, use the Assign link in the Participants listing. This will open a new window.
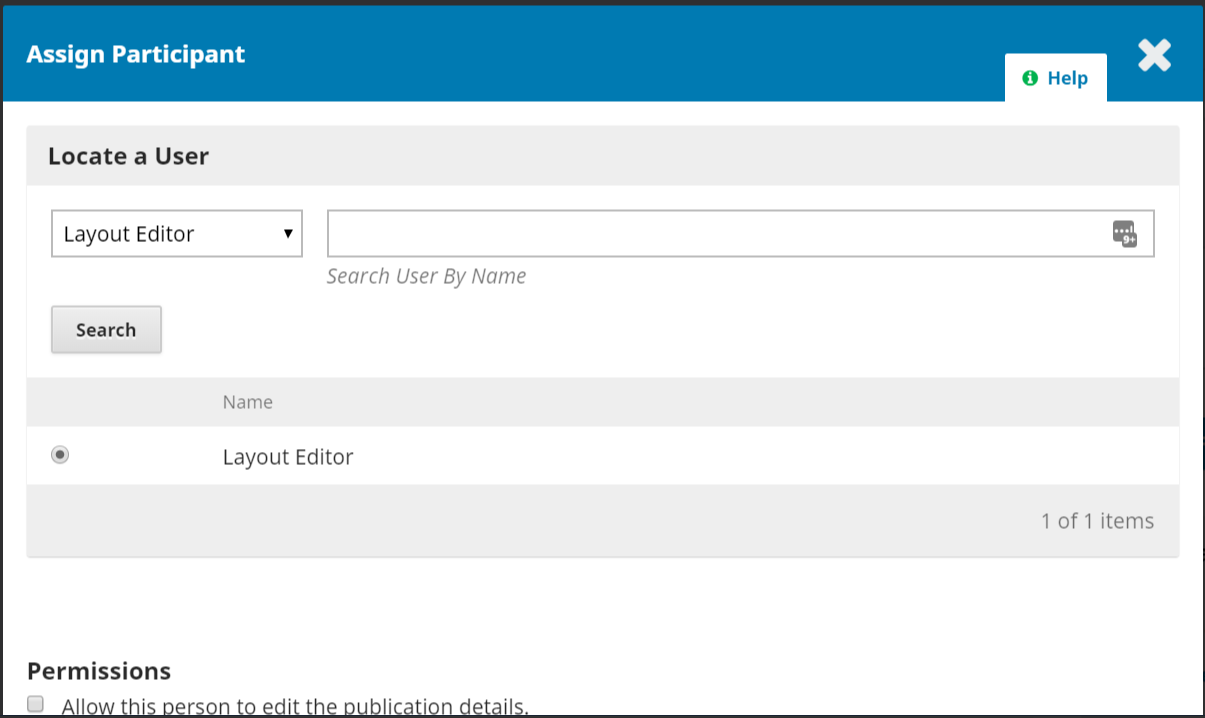
Use the part selector and search push button to observe appropriate users. Select the user and choose a predefined message, then click OK to send.
The user has now been notified via email and in the dashboard.

You tin can now see the Layout Editor in the Participants list, and you can meet the request notice in the Production Discussions panel. You can now wait for the Layout Editor to complete their tasks.
Layout Editing #
As a Layout Editor, you will have received a message inviting you to create the galleys for the submission. To get started, login to the system and go to your dashboard.
From here, notice the submission and select the Production link. This will take you to the submission record.
From the Production Prepare Files panel, download the files to your desktop and piece of work exterior of OJS to convert them to galley files. The next section explains galley file formats and preparation.
Note: PKP is currently working on a project to automate the conversion of Microsoft Word documents into other formats, including XML, HTML, PDF, EPUB, etc. Keep an eye on our blog for updates.
Prepare and Add Galley Files #
A Galley is the final publication-ready file that has been prepared for readers and will be published on the article folio. Galleys should exist in a stable non-editable format (e.one thousand., HTML, PDF, ePub, or XML) versions of the full-text article. Galley files tin likewise include supplementary material such as multimedia files and research data. You can publish a galley file for an article and for an entire issue.
Galley file component types #
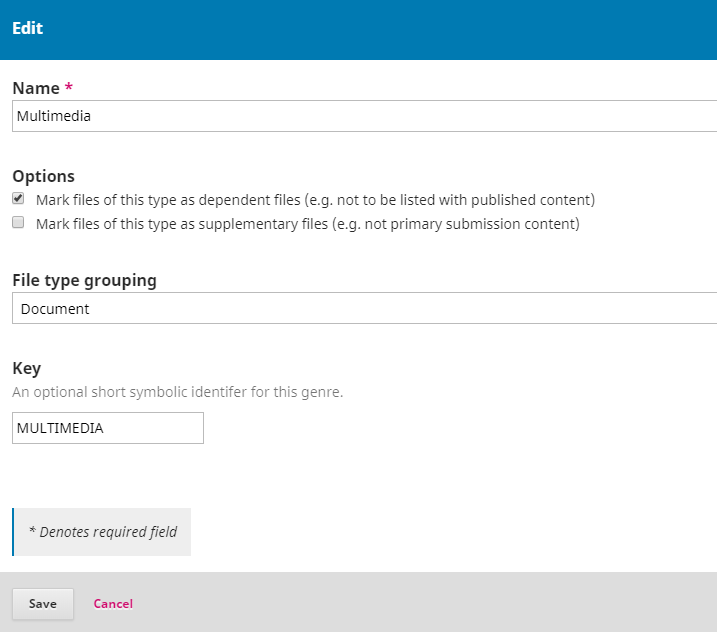
When yous upload a galley file, you will need to select a Component Type. These are the same component types that authors select from when they upload submission files. You lot can configure component types under Workflow Settings > Submission > Components, according to whether you desire the component blazon to be published and whether yous want a link to it to announced on the article landing page or in the table of contents.
The configurations are equally follows:
- Dependent: the link will not appear with published content at all
- Supplementary: The link will announced on the article landing page
- Neither supplementary nor dependent: The link will appear on the article landing folio and in the table of contents
For example, if you want to embed multimedia files in HTML files and accept these announced on the landing page, the issue page, and the submission page, you would configure the settings as follows:
- Go to Settings > Workflow > Submission > Components tab
- Click the blue arrow side by side to HTML Stylesheet and Edit
- Uncheck "Mark files of this blazon equally dependent files" and "Mark files of this type as supplementary files". Click Save.
- Click the blue arrow next to Multimedia and Edit
- Uncheck "Mark files of this type as supplementary files". Leave "Dependent files" checked off. Click Save.
Galley file formats #
Online journals publish their articles in a variety of file types. The near common are PDF and HTML, only increasingly additional formats are being used, such as ePub, MP3, and XML.
Plugins in OJS let PDF, HTML, and XML files to be viewed in a spider web browser or downloaded. If the files are being downloaded instead of displayed in the browser, you may need to enable one of these plugins under Website Settings > Plugins:
- PDF.JS PDF Viewer provides rendering support for PDF Article files.
- eLife Lens Commodity Viewer provides rendering back up for JATS XML Article files using eLife Lens.
- HTML Article Galley plugin provides rendering support for HTML Article files.
Other formats may require additional plugins or can be downloaded directly. Alternatively, you may host the full-text content on a unlike platform and embed a remote URL past choosing the checkbox: "This galley will be available at a split website."
Using templates #
Requiring all submissions to use a document template that is pre-formatted with your journal'southward publication styles (e.chiliad., the font face, font size, boldness, placement, etc., of the header, body, footers, etc.) can make your document conversion much easier. Microsoft provides a brief overview for creating templates in MS Word.
Once yous've created a template that matches your journal style, it may be useful for submitting authors, layout editors, or other users. Here'due south an example of an OJS journal that requires authors to download and use a template file: Paideusis.
Ideally, your template should be created using styles rather than direct formatting. This not simply ensures consistency throughout your documents, but will also help in whatever conversions to other formats (e.g., HTML). Here's an explanation of the departure between styles and direct formatting in Word
PDF files #
A PDF is the easiest blazon of file to create from a Discussion certificate. Current versions of Microsoft Discussion (and other word processors) let yous "Save As" or "Consign Every bit" a PDF. The majority of OJS journals publish their articles every bit PDFs.
PDFs are too popular with many readers as they nigh closely recreate the printed page. However, PDFs are often less flexible on mobile devices and do not always handle links or embedded media (such as sound or video files) specially well. With the widespread usage of mobile devices, ensuring your audience tin can read your articles on their phones or tablets is increasingly important.
Case (see PDF link at bottom of page): Irish Journal of Engineering Enhanced Learning
HTML Files #
HTML files have the advantage of flexibility. They handle linking and multimedia very well, and can fit on merely well-nigh whatever screen - including phones and tablets. They practise, however, look unlike than a printed page, so some readers prefer a PDF. The ideal situation is to provide both PDF and HTML files to all-time meet the needs of different users.
Creating an HTML file tin crave more time and effort than creating PDF files. Word processors do not take effective tools for doing a "Salvage Equally" to HTML. Microsoft Give-and-take tries to practise this, just the results are non useful for uploading to OJS. Instead, try following this workflow:
- Convert the Word document. You lot can utilize this free online tool to do an initial conversion.
- Open the resulting HTML files in a text editor (e.one thousand., NotePad in Windows) or HTML editor (due east.m., Adobe Dreamweaver). From hither, you lot will need to make any terminal clean up or formatting. Understanding the basics of HTML is required. There are many free tutorials, but information technology does take some time.
- Keep the HTML formatting basic. Just focus on paragraphs, line breaks, headings, and links. Don't worry about fonts, colours, or other design elements - OJS volition take care of all of that automatically as function of the overall journal design.
- Upload to OJS every bit an HTML galley file
- The HTML viewer renders HTML files within an iframe, which may affect navigation to hyperlinked web pages. You can featherbed this characteristic by opening hyperlinks in a new browser tab, by adding the
target="_blank"attribute to your href tags.
A few case HTML templates tin be found and adapted from these sources:
- Resources past U of A - License: CC0 1.0 Universal (CC0 1.0)
Examples (see HTML link at bottom of the page):
- Cultural Anthropology
- Evidence Based Library & Information Practice
Manner HTML galley files #
Information technology is possible to style the design of your HTML galley files in bulk or on an individual per-article footing. Styling in bulk tin simply be done if you are using a custom theme.
To fashion an individual HTML galley file:
- While creating the HTML galley file, ensure that it includes a reference to the stylesheet in the
<head>section, e.g.<link rel="stylesheet" href="./article_styles.css" blazon="text/css" /> - Upload the HTML galley file (see below for instructions on how to Add Galley Files)
- Edit the galley file
- Upload the CSS stylesheets with the appropriate Component Type - HTML Stylesheet
To fashion all HTML galley files: If you are using a custom theme plugin, you tin can write a line of code to include a custom way for all HTML galleys. This will only apply to HTML galley files that practise not take a style applied individually. More information on custom theming is bachelor in the PKP Theming Guide.
Add together images and multimedia to an HTML Galley #
If you would similar to include images or multimedia files in an HTML galley file, you can upload them as Dependent Files to the submission, and link to them within the file to display them.
Before starting time the item upload, y'all will demand an HTML page containing one of the following:
-
<sound controls>chemical element (for MP3) -
<video>element (for MP4), or -
<img src="imagename">tag for images
The HTML page should too incorporate the verbal proper name of the file you are connecting to.
You will need to relieve the audio/video/image file in MP3/MP4/JPEG/GIF format using the name in the HTML page.
Your HTML file will need to contain the post-obit minimum code (for sound files). For the related video or image file code, delight see the w3schools instructions on embedding video in HTML or instructions on embedding images in HTML.
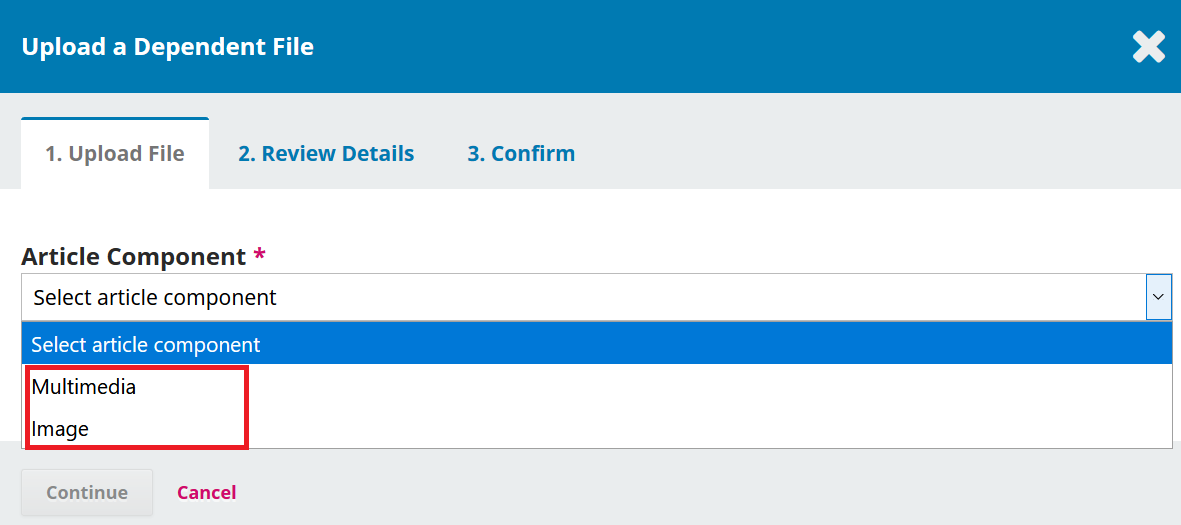
<html> <caput> <title>MP3 upload</championship> </head> <trunk> <sound controls > <source src= "filename.mp3" type= "audio/mpeg" > Your browser does non support the audio element. </audio> </body> </html> In OJS you will need to configure the settings for your Component Types earlier calculation multimedia files. See Galley File Component Types to a higher place for details about adjusting these settings.
Brand sure you have "Multimedia" and/or "Image" files configured as "dependent files" in the Component Type settings.
Now get back to the submission to upload an HTML stylesheet to display your multimedia file. See beneath for instructions on how to Add together Galley Files. In addition, when you lot upload the file:
- Characterization the galley according to the multimedia file type (e.thou., MP3, MP4, Image)
- Select HTML Stylesheet from the Article Component dropdown
- Upload the HTML file you prepared with at least the minimum code (instructions above)
- Click Continue
- In the Review Details tab you can upload Dependent Files. This is where you will upload the MP3/MP4/image file.
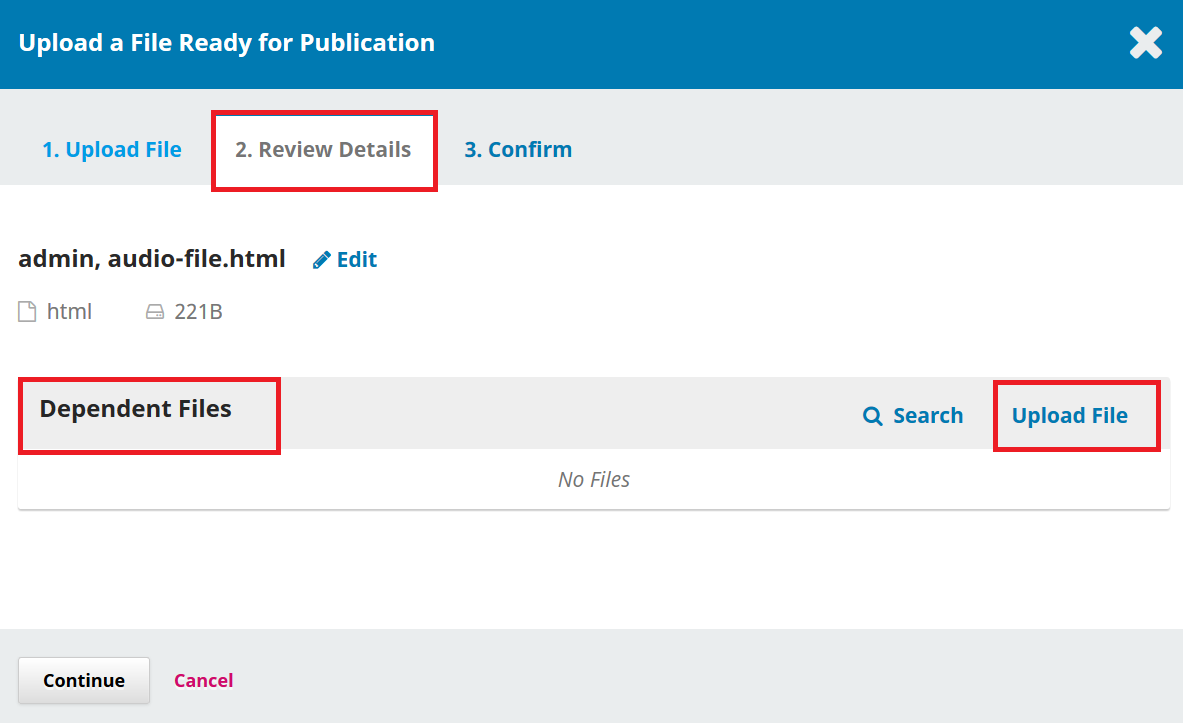
Select Multimedia or Prototype from the Commodity Component drop-downward menu, and upload the MP3, MP4, or image file.
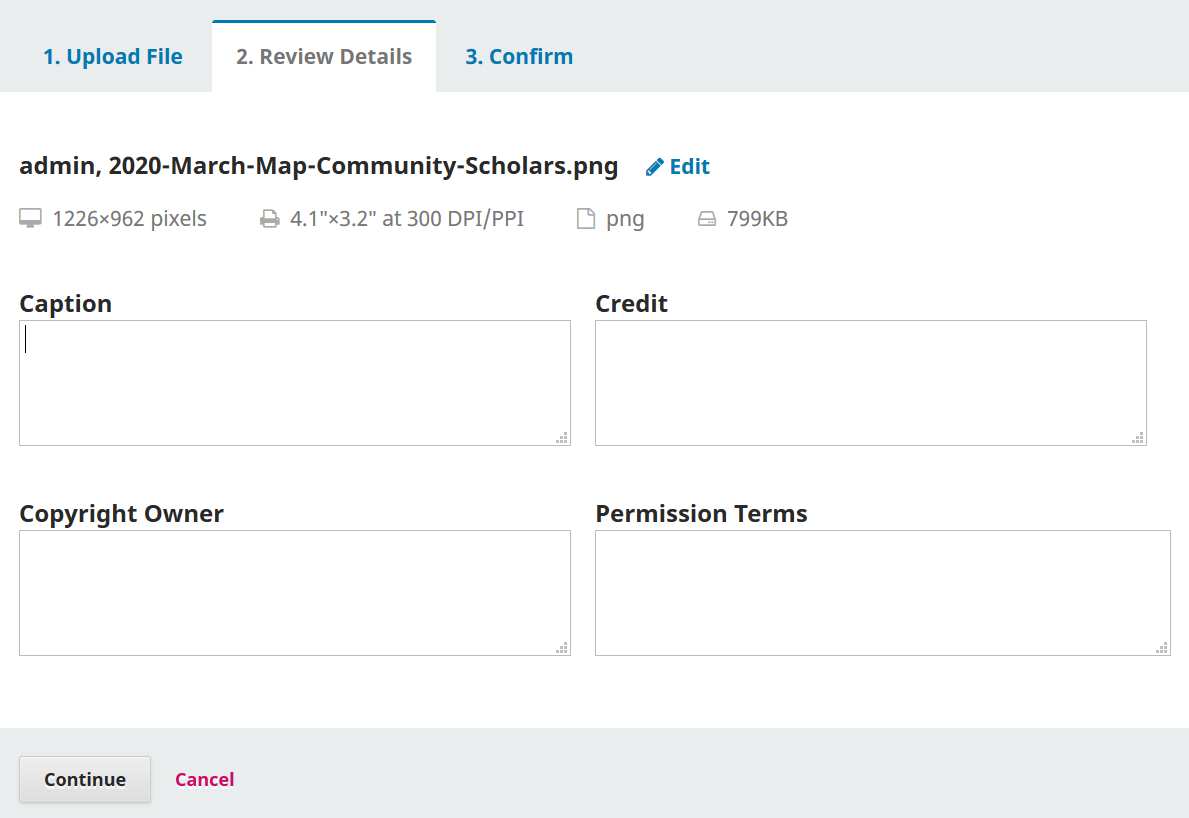
When uploading an image file you lot will be asked to add together a Caption, Credit, Copyright Possessor, and Permission Terms, as applicable.
Click Continue to complete the upload, review the details, and confirm. Your multimedia file has at present been added as a dependent file along with the HTML, and volition be embedded in the HTML when the item is published.
ePUB Files #
Like to HTML files, ePub files are ideal for mobile devices merely require specialized coding to create. Conversion tools are bachelor, such as Calibre. More detailed HOW TO instructions for creating ePub files are available here.
Like HTML files, some additional cleanup may exist required subsequently conversion and require some knowledge of the format.
Example (run into EPUB link at bottom of the page): International Review of Research in Open and Distance Learning
XML Files #
XML files are structured files in which each part of the article is tagged every bit a distinct element. This allows the reader to easily navigate through and admission figures, images, metadata, references, and parts of the commodity text. Creating XML files is a very efficient mode to publish in multiple formats. When you lot create an XML file, you can and so automatically generate PDFs, HTML, ePub, and other formats.
PKP is developing tools that volition allow yous to create, convert, and edit XML files within OJS. Currently y'all need to create and edit the files outside of OJS. If you want to produce XML galley files for your journal, you can apply the services of a graphic designer or typesetter, or if you have some XML expertise you tin can create the files yourself. W3schools has excellent tutorials on XML.
Example Food and Nutrition Research
Multimedia files #
Information technology is becoming increasingly popular for journals to publish multimodal content, including audio and video files, in addition to text-based articles. In addition to providing audio and visual formats for text-based articles, which can aid to increase the accessibility of journal content, multimodal content is increasingly valued equally an alternative form of scholarship which represents and reflects dissimilar modes of expression and means of knowing. Journals that choose to create audio versions of text-based articles may choose to exercise so manually, by having someone read the article into a voice recorder, or automatically using Text to Spoken communication software.
Multimedia files can exist embedded into the article page on your journal site, or tin can exist linked to from an external site, such every bit YouTube or SoundCloud. If you use an external site, the quality may exist amend, but statistics will not be collected on galley views or downloads, and preservation of the content is dependent on the external site.
When uploading a multimedia file, you tin can select "article text" from the component list and upload the file (MP3, MP4, image file, etc) directly. This will permit the user to access the file using the image viewing software or the audio/video playing software installed on their device.
Example (come across MP3 link in side menu at bottom of the page): International Review of Research in Open and Distance Learning
Alternatively, you can embed the sound, video, or image file in an HTML page and then that users can view the file direct in their browser. Come across Add images and multimedia to an HTML galley above for instructions on how to do this.
Case: Intersectional Apocalypse
Upload a multimedia file linked from an external site #
Upload the multimedia galley file in the Production stage of the workflow. Encounter below for instructions on how to Add Galley Files. In add-on, when you lot upload the file:
- Label the galley according to the multimedia file type (eastward.g., MP3/MP4)
- Check the box indicating "This galley will be bachelor at a separate website"
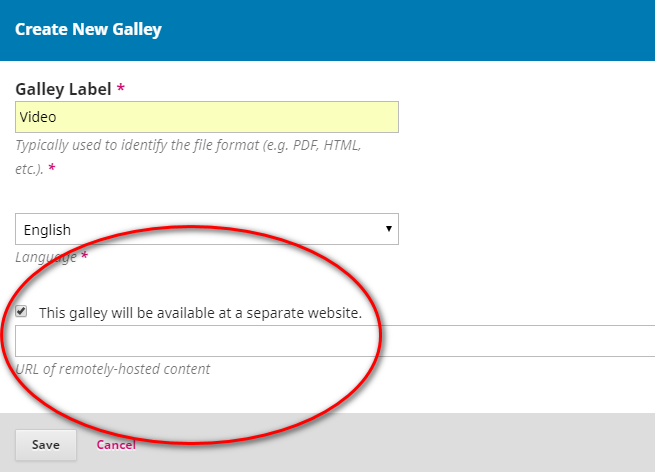
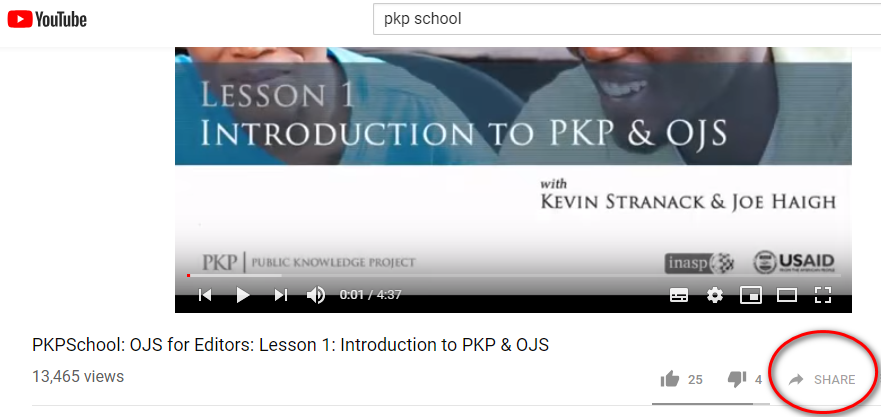
To get the URL, locate the video or audio in YouTube, SoundCloud, etc., and so click Share and copy the URL.
Paste the URL into the remote galley field and click Salvage.
The video should now announced in the published submission.
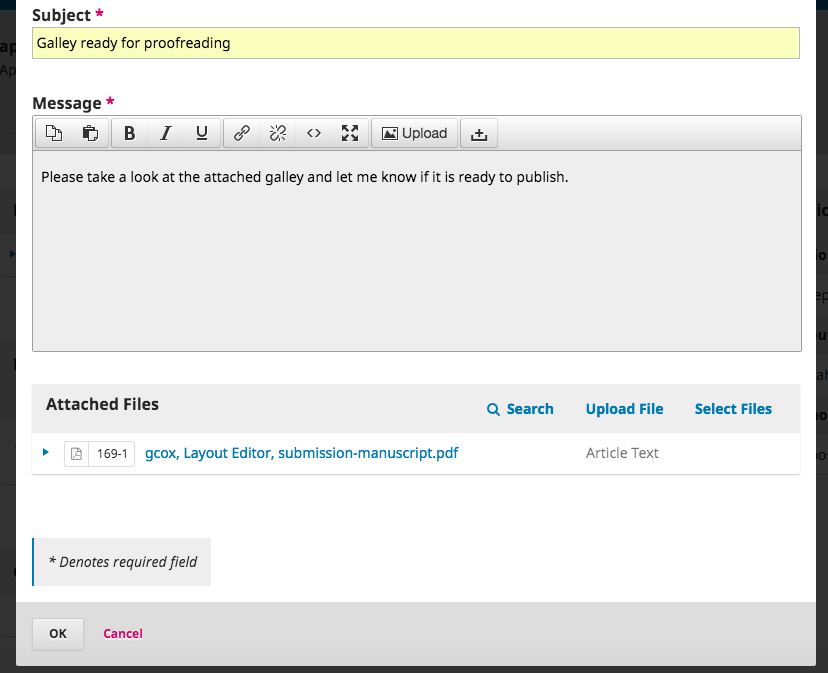
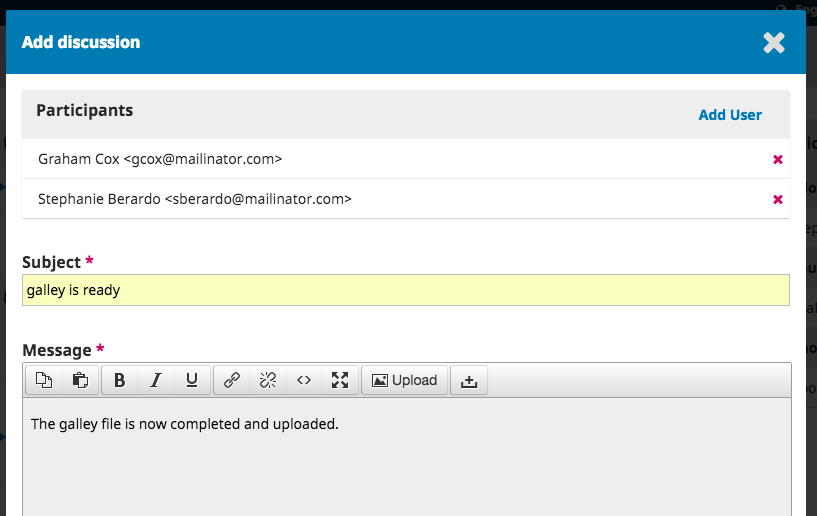
Adjacent, you will want to share the PDF with the author for a final await and sign off. To do then, use the Add together Discussion link in the Production Discussion panel. This will open a new window.
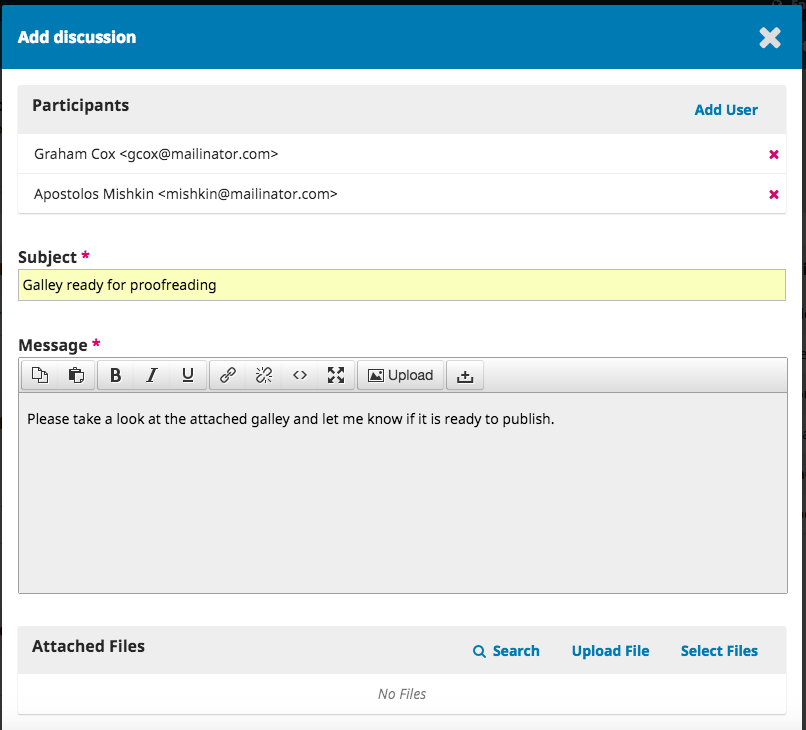
Recall to add the author at the meridian of the window and so add a subject and a message.
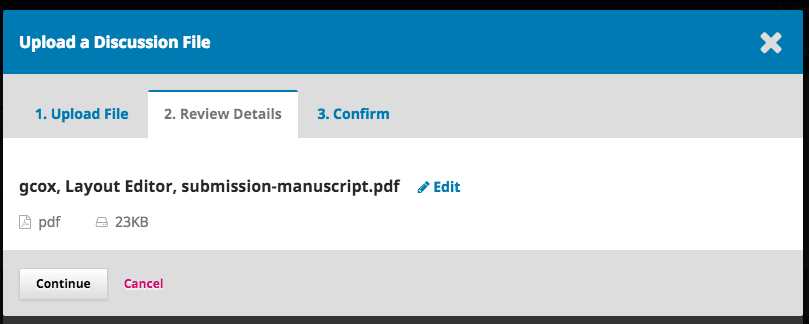
Before sending, attach a copy of the PDF file using the Upload File link. This will make information technology available to the author.

Remember to select the correct Article Component and and then upload the PDF.
Click Continue.
Next, brand any changes to the file name (usually yous don't need to do anything here).
Then, y'all can upload additional files, if necessary.
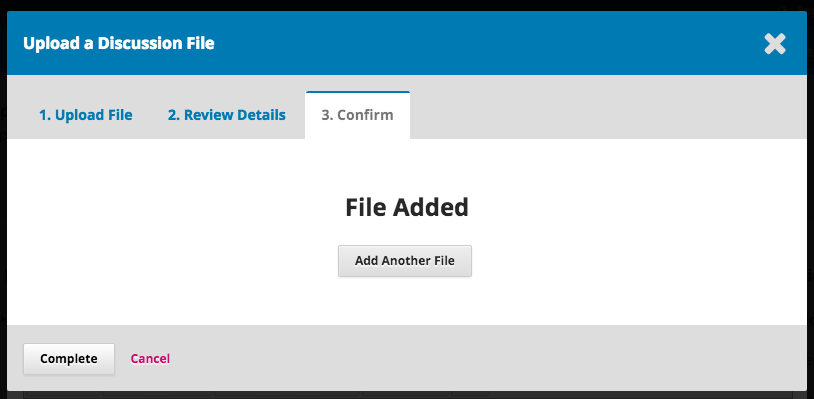
Once you are done, striking Complete.
The file is at present attached and you tin can transport the bulletin using the OK push.
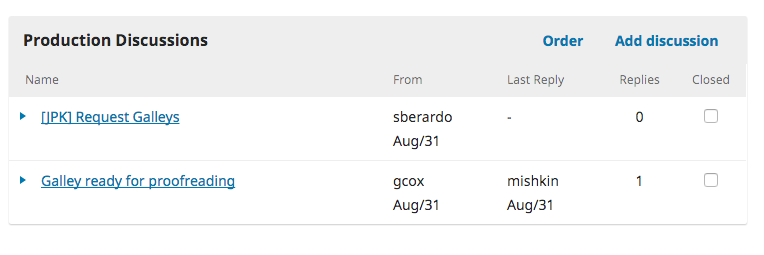
The Author has now been notified and you tin await their response.
Author Response #
Once the author has had a gamble to review the galleys and answer, you will receive an email notification and will encounter a reply in the Production Discussions.
Add together Galley Files #
Now that the Author has proofread the galleys, you tin can brand any final changes, and then upload them to the submission. To upload galleys, go to the Publication tab, so Galleys.
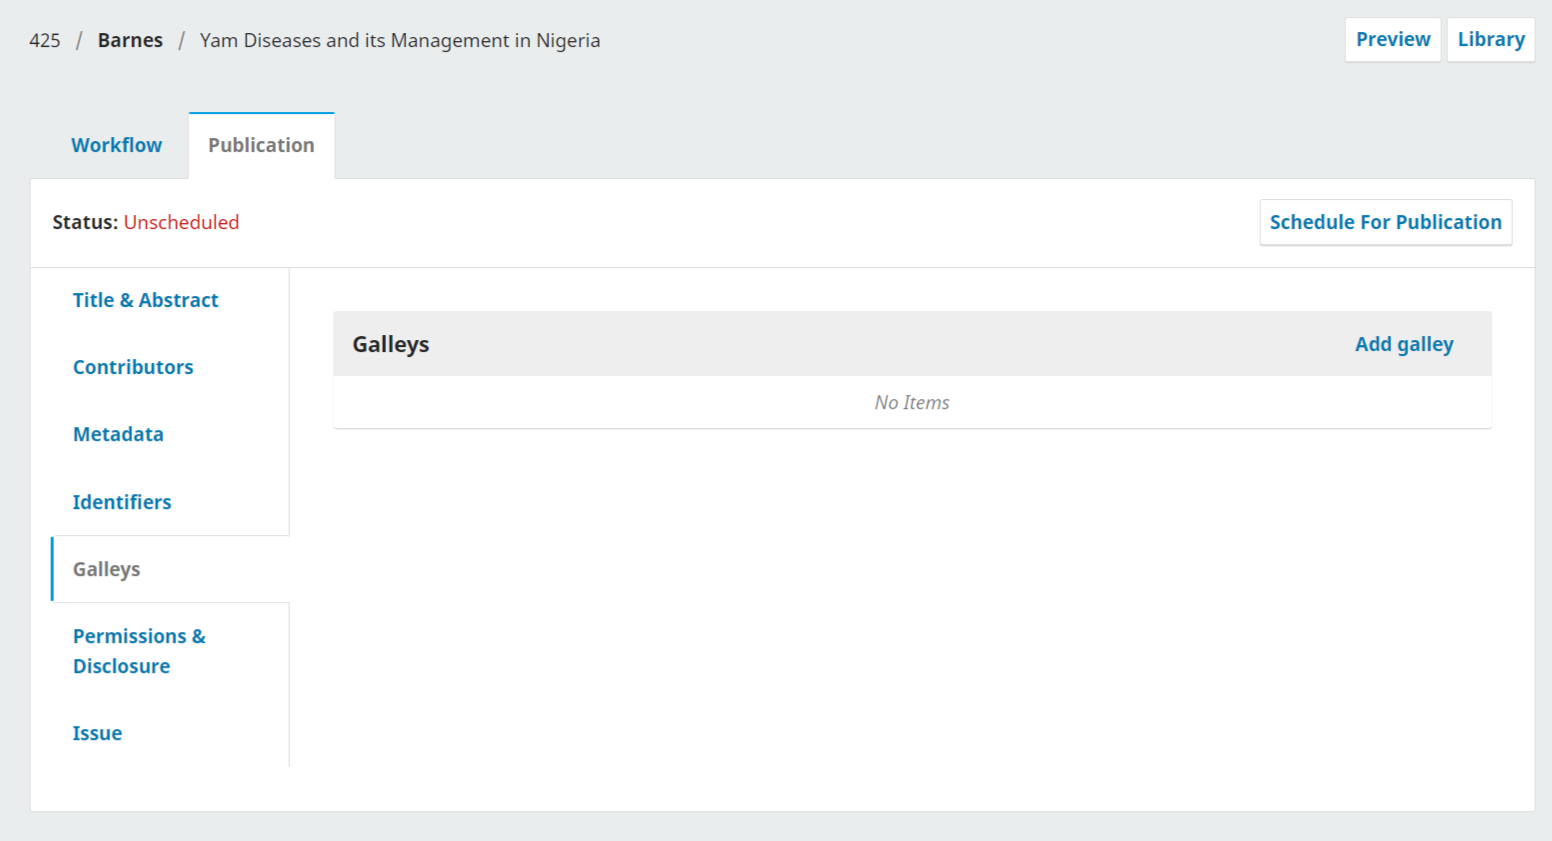
And so click Add galley, which will open a new window.
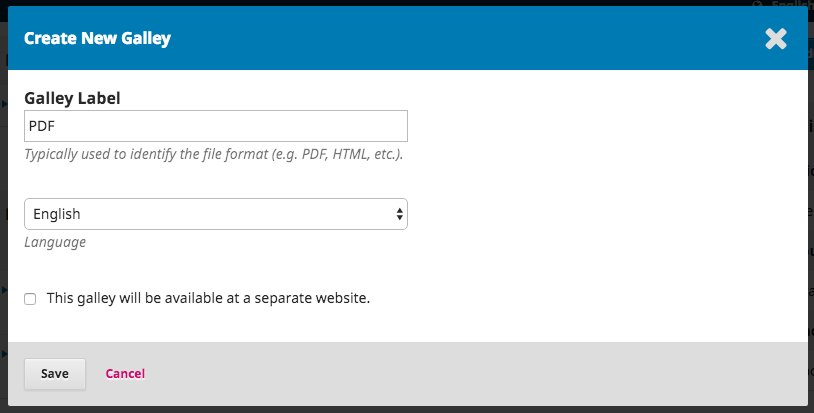
Add an appropriate label (eastward.thou., PDF, HTML, etc.) and click Salvage.
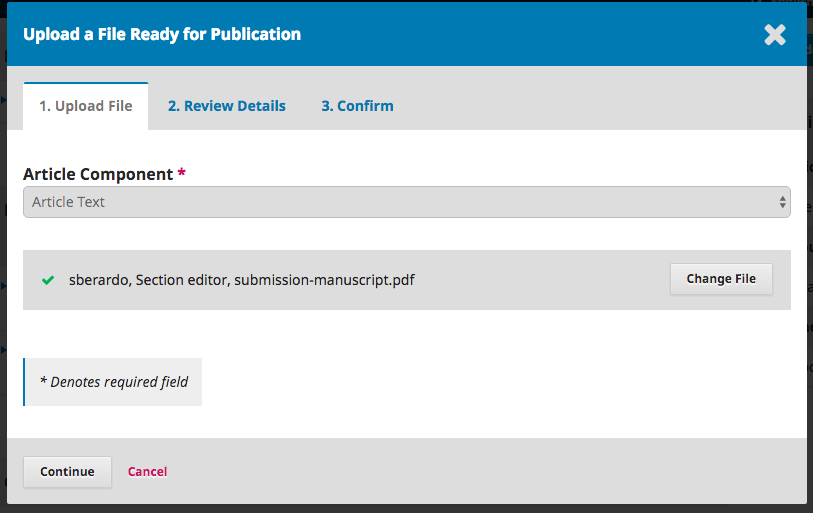
From this window, choose the appropriate article component (e.chiliad., article text) and upload the galley file. Click Continue.
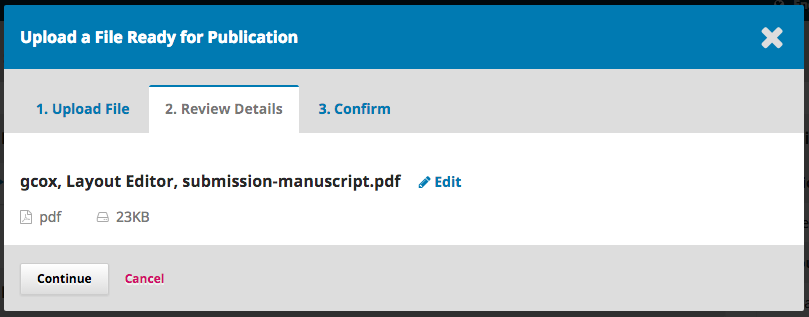
If necessary, modify the filename. Click Continue.
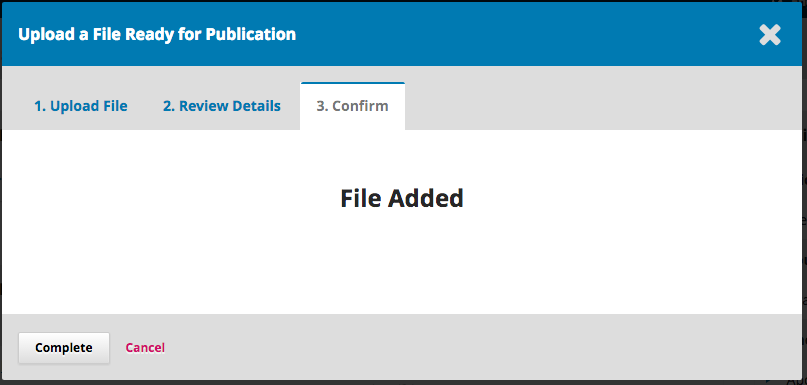
If you accept more than files, upload them now. Otherwise click Complete.
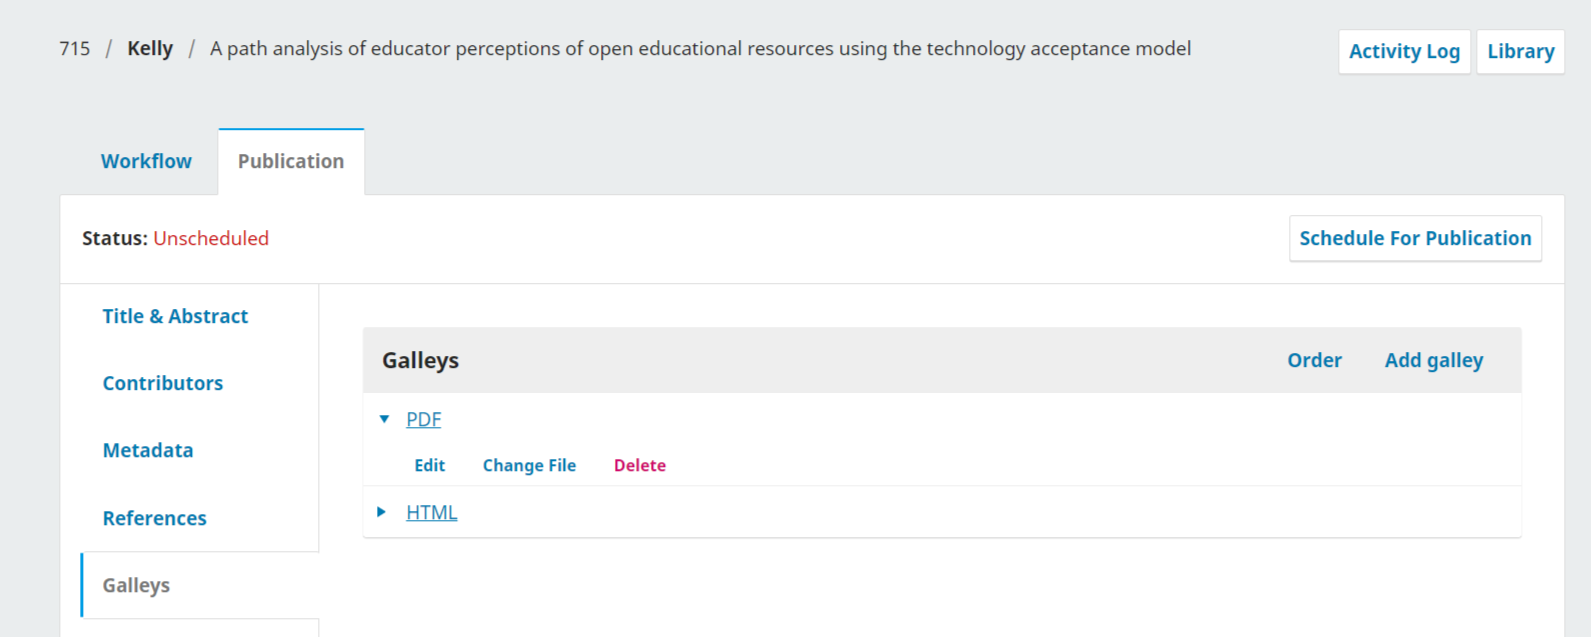
You can at present meet the galleys in the Galley panel.
Y'all can make changes to the upload past selecting the blue pointer to the left of the galley label, which reveals options to edit, change the file, or delete.
Edit Galley Files #
If you want to make a change to a galley file or galley file characterization after information technology has been uploaded, you can edit it. Please note that if the article has already been published, to make a change to the galley file you will start have to un-publish the article or create a new version (encounter Versioning of Articles beneath). But before the article is published, you lot tin edit the galley file easily.
- Open the submission from the submission dashboard
- Go to the Publication tab and Galleys
- Click the bluish arrow next to the file you want to edit
- If y'all would like to edit the galley label, click the Edit button that appears and change the Galley Characterization
- If you would similar to alter the file, click Change File and upload a new file
- When you are finished editing, click Save
Inform the Section Editor #
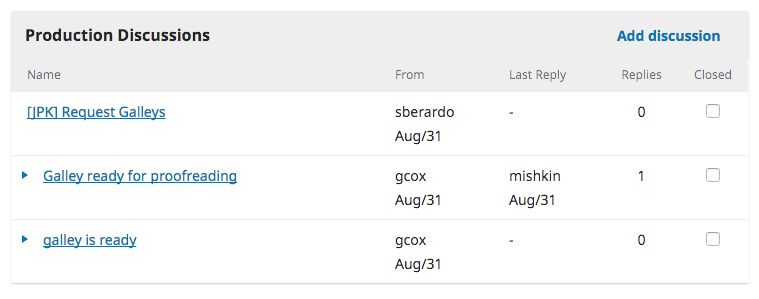
Finally, you volition need to inform the Section Editor that the galleys have been completed. To do so, use the Production Discussion panel and choose the Add Discussion link.
Add the Section Editor to the tiptop of the page, and then include a subject field line and message. Click OK to ship the bulletin.
You can now see the final give-and-take.
Section Editor Informs Editor #
At this point, the Section Editor receives the notification from the Layout Editor and reviews the galley files.
They can either ask the Layout Editor to make additional changes (using the Production Discussions) or inform the Editor that the galleys are ready for publication.
To inform the Editor, use the Product Word panel'due south Add Discussion link.
The next stride in publishing the submission is to check and finalize the metadata.
Before publishing the submission, you should bank check that the metadata for the article is complete and authentic in OJS and matches the metadata on the PDF. This is of import for ensuring that the content is indexed by Google Scholar, discoverable by other services, and accessible to readers. To acquire more, see the Better Practices in Periodical Metadata guide.
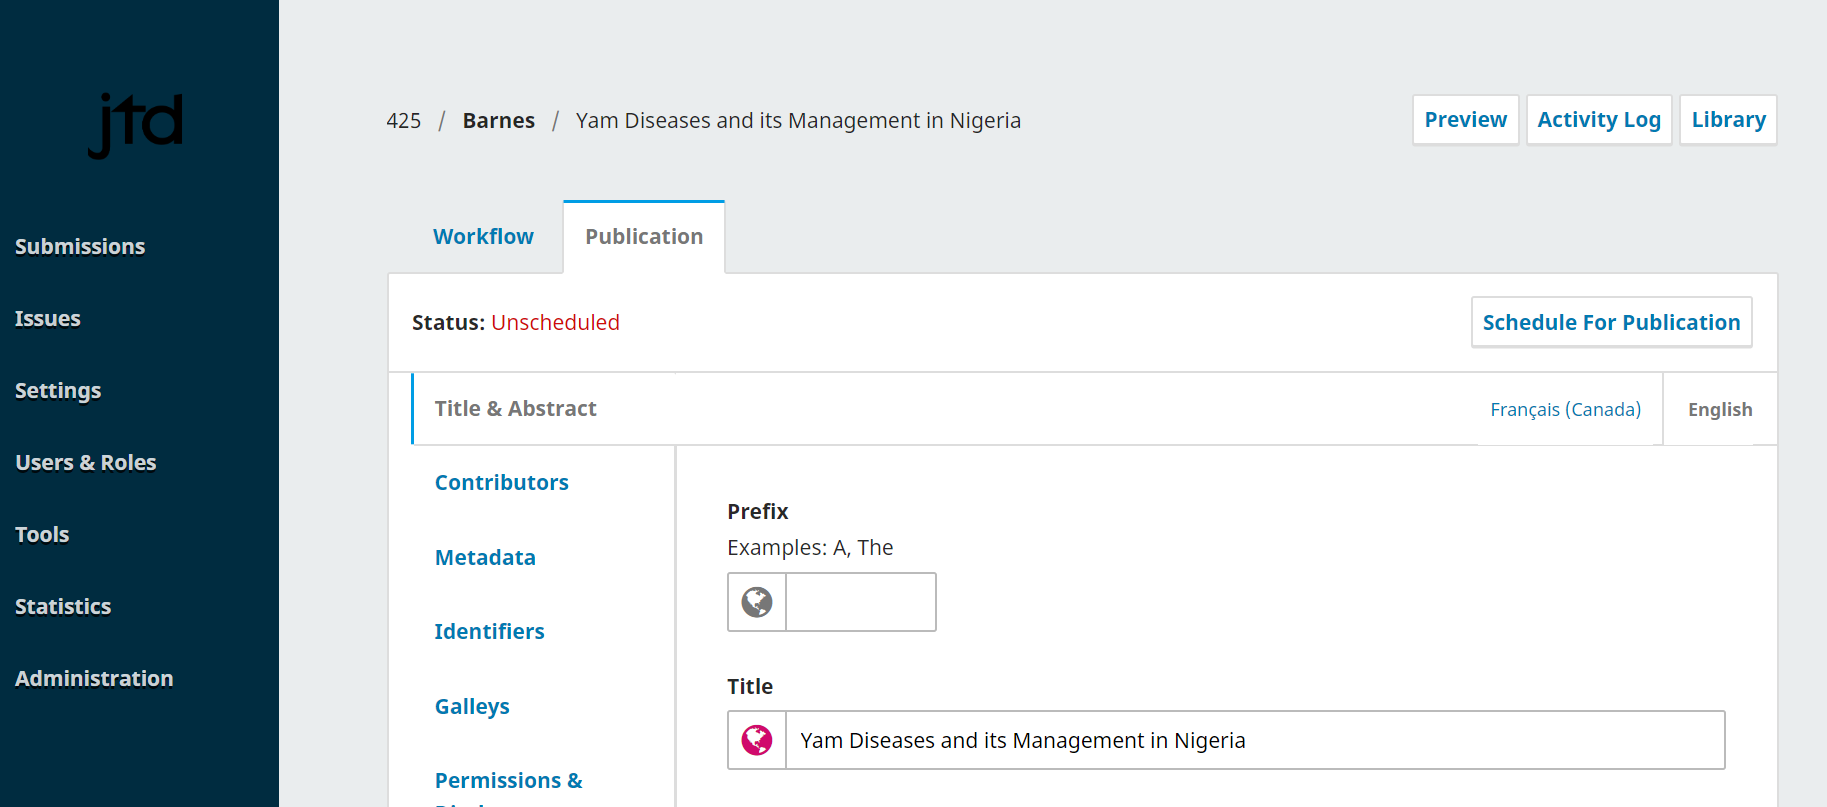
You can cheque the metadata for the submission by going to Submissions, opening the submission, going to the Publication tab, and checking the Title, Contributors, and Metadata tabs.
At this indicate you tin can also add the commodity to a category to display it on a thematic category page on your site and extract and salvage references (if y'all have not already).
Add the Article to a Category #
Categories can be used to organize your articles into thematic collections. If you apply categories in your periodical, you can optionally add the article to a category or categories. For instructions on how to create categories see the Periodical Settings chapter. You can add the commodity to a category by editing its metadata.
- In the article submission, go to the Publication tab
- Click Issue
- In the Categories box, cheque the category or categories that y'all want to add the article to
- Click Relieve
Extract and Save References #
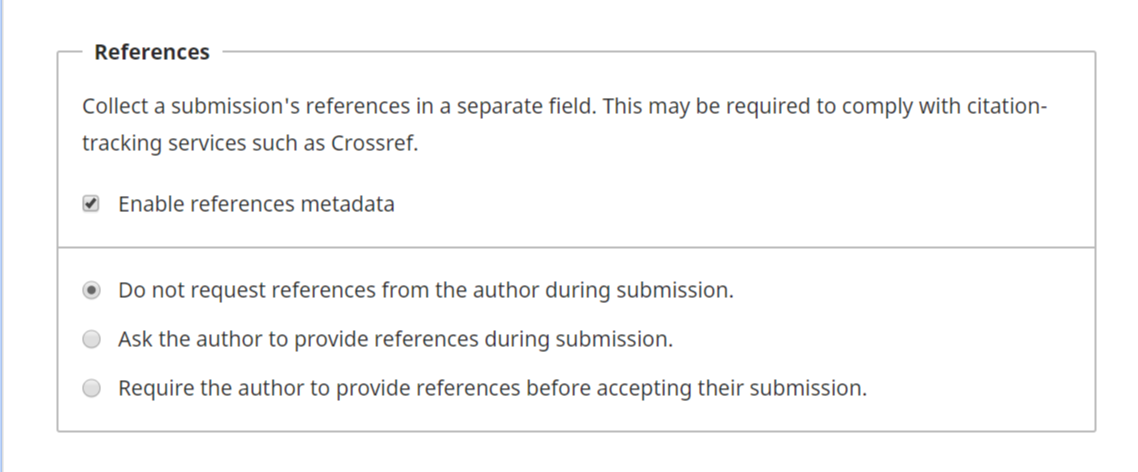
If yous would like to display the commodity'southward bibliographic references on the article page with linked DOIs, and submit the references to Crossref with the residuum of the article'southward metadata, you tin can use the "Extract and salve references" characteristic. This feature tin only exist used if you're using the DOI plugin and the Crossref plugin to export your metadata to Crossref. The feature volition shop each reference in the database equally a separate reference and add the DOI to the reference on the article page. It volition also make information technology easier for indexing services, such as Google Scholar, place and index the article's citations.
The first thing y'all must do is enable References every bit a submission metadata field.
- Get to Workflow Settings > Submission > Metadata
- Coil down to References and check off Enable references metadata
- New options will appear beneath and you can select to either
- do not request references from the author during submission - the References field will non be on the submission form and instead references can be added by an editor
- ask the author to provide references during submission - the References field will be on the submission form and authors can optionally add together their references to it, or an editor can add references to the submission later
- crave the author to provide references earlier accepting their submission - the References field volition be on the submission form and authors will be required to add their references to it
- Click Save
At present if you go to a submission tape's Publication tab y'all volition run into a References tab below. An editor tin can open up the tab and copy and paste the article'due south references into the field. In addition, if y'all checked the 2nd or third choice above, there will be a References field when an author makes a submission and the author will be able to add their references to it.
Each reference should be on a split line and y'all should sure the text yous paste into the field is unformatted and has no extra line breaks or spaces. Remove whatever DOIs in the references if you plan to add them subsequently with the Crossref Reference Linking plugin.
When the commodity is published, the references volition appear on the article page and the references will be submitted to CrossRef.
After you have exported the commodity's metadata to Crossref, you can insert the DOIs for the article references from Crossref if you lot use the Crossref Reference Linking plugin. Instructions on how to use the plugin are bachelor in the Crossref Plugin Guide.
Once y'all have the plugin set and have exported the article's metadata to Crossref, you can insert the DOIs from Crossref back into the references:
- Open the submission
- Go to the Publication tab and References
- Click Cheque Crossref DOIs
- Some DOIs will now be added to the references
Create Effect #
This PKP School video explains how to create, edit, publish, and manage Issues. To picket other videos in this series, visit PKP'southward YouTube channel.
When you are prepare to publish the commodity, you have to create an issue to publish information technology in beginning. So you will schedule articles for publication in the issue. The articles volition non be published until you publish the issue every bit a whole. This section explains how to create and edit issues.
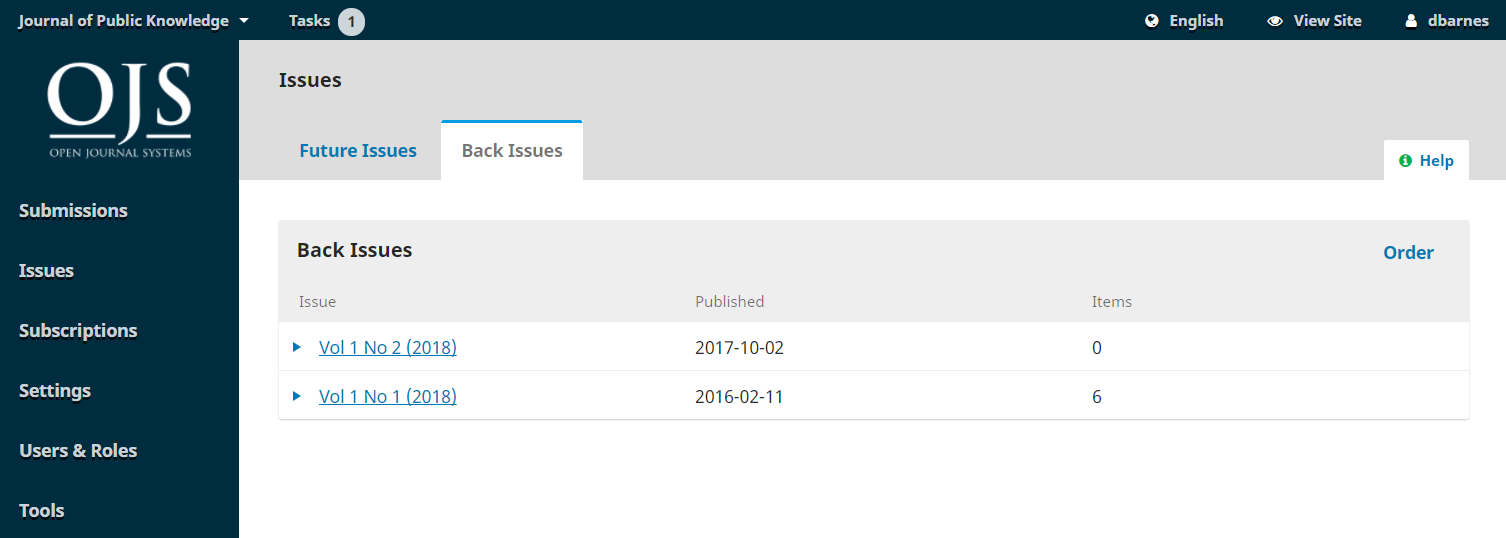
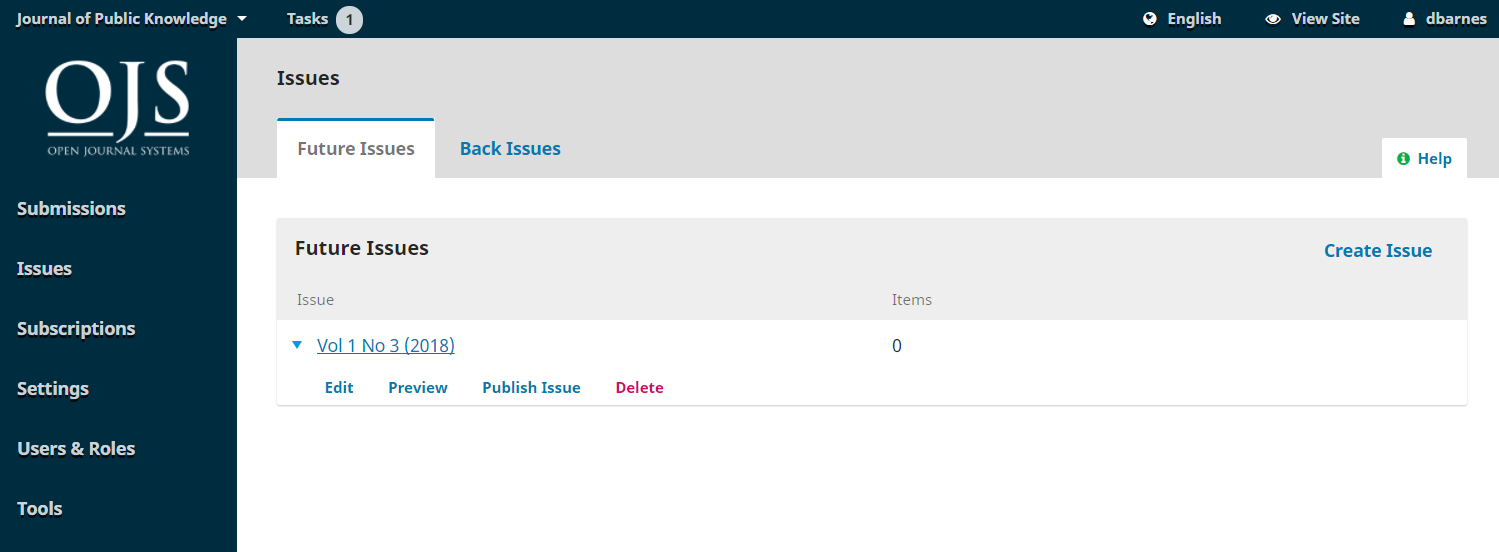
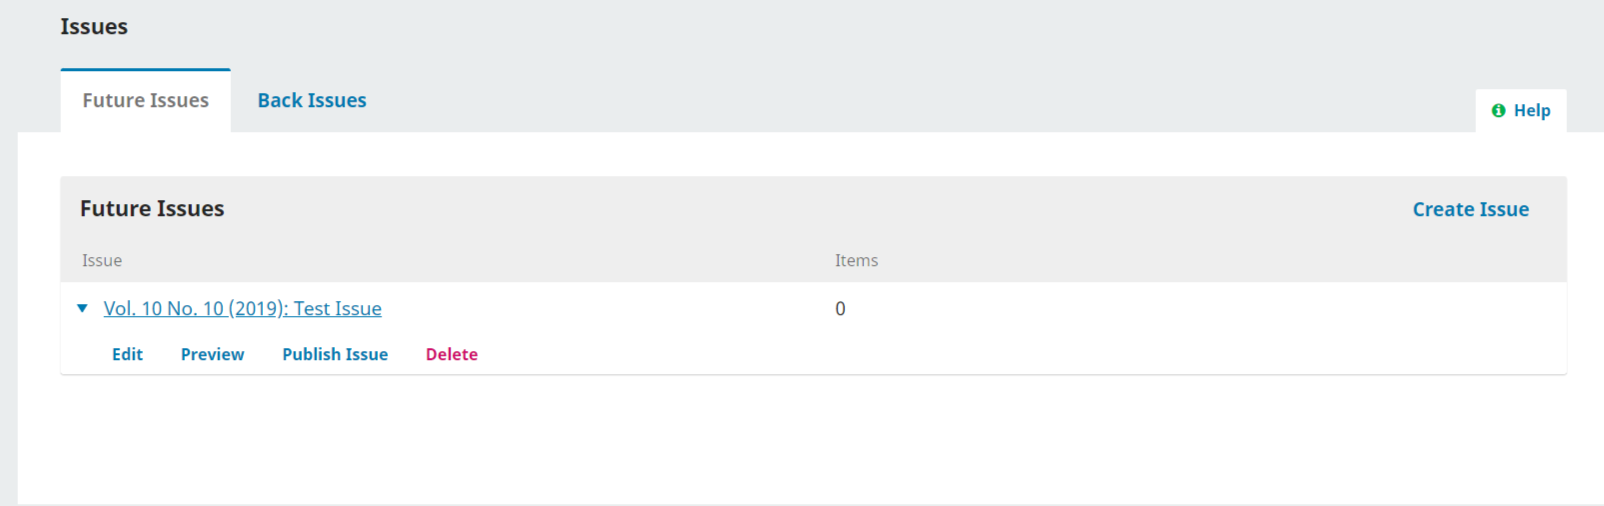
From the left card, select Issues to manage all of the issues for your journal.
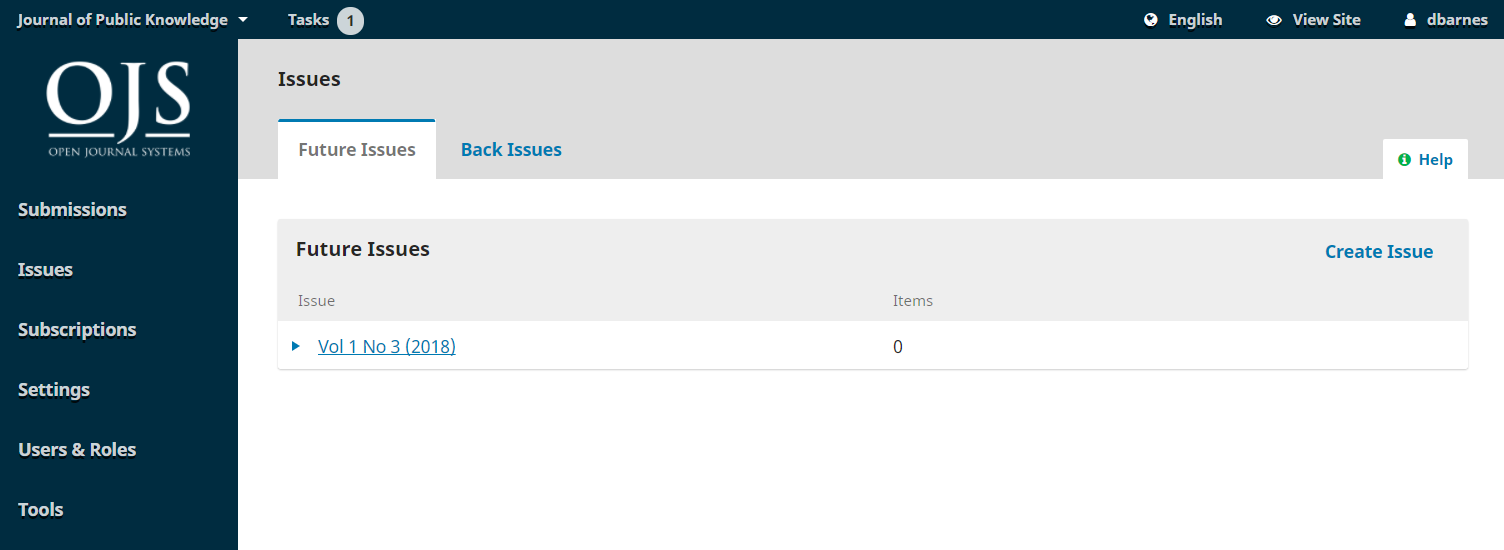
You lot volition see tabs for Future Problems and Back Bug.
Future Issues are all of your unpublished issues. You tin can create as many of these every bit yous wish, and schedule submissions to any of them.
Back Bug lists all of your published issues.
To create a new issue, use the Create Issue link and fill in the course.
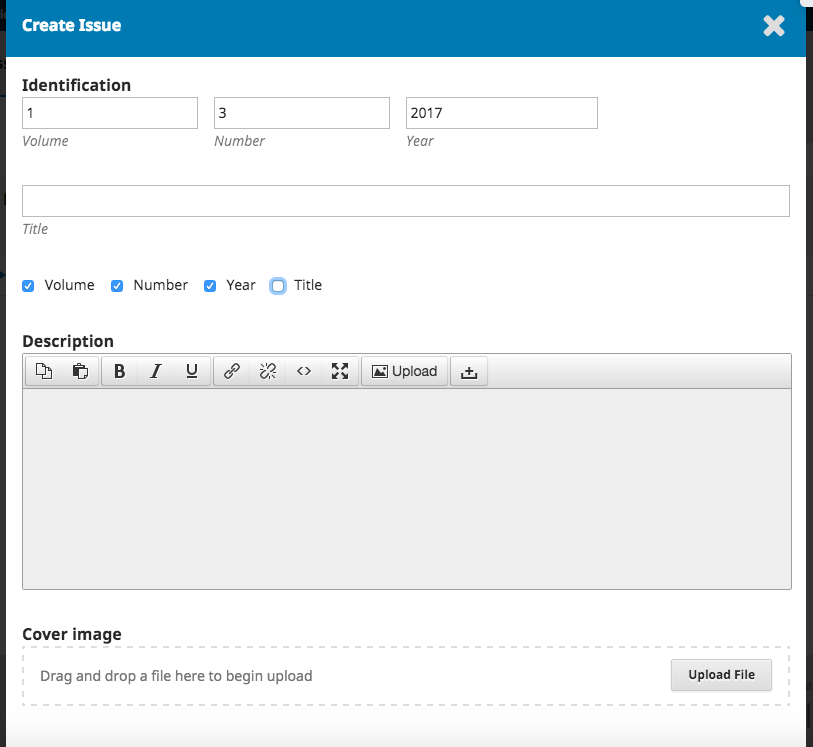
There are spaces to add volume, number, year, and title information (e.g., Special Effect #1), as well every bit a description, encompass prototype, and custom URL. The encompass epitome and description will appear at the tiptop of the effect page on your site, if you lot add them. If you have book, number, and title checked off beneath, yous will be required to fill something into each field.
When you're finished, click Relieve.
Edit Issue #
You tin besides edit an existing future issue by selecting the bluish arrow to the left of the effect entry on the Future Problems page.
This will reveal an Edit link, which will open a new window of information.
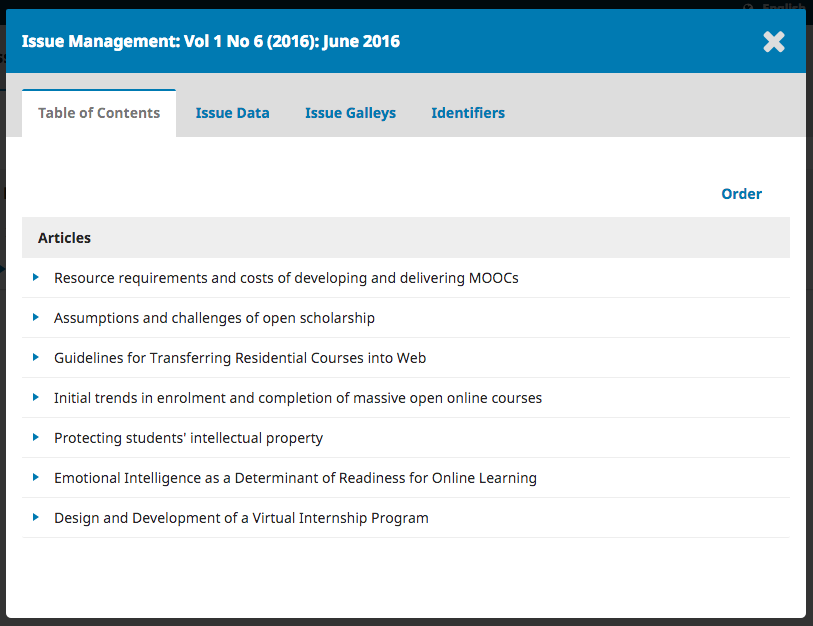
Table of Contents: For a new outcome, this will be empty, just for issues that have had submissions scheduled, they volition exist listed here.
Employ the blue arrow next to each submission to reveal links to go directly to the submission record or remove information technology.
Issue Data: This provides access to the volume, event, number information you entered when first creating the consequence.
Issue Galleys: This allows y'all to upload galley of the complete consequence – eastward.one thousand., one PDF containing all articles. This volition be linked from the issue web page.
Identifiers: Utilize this space to add a DOI for the issue, if your periodical supports effect-level identifiers.
Order Sections and Articles #
When you publish an issue, manufactures will be displayed under your journal'south sections.
If you go to Journal Settings > Sections and edit a section, yous can configure how information technology will announced on your published event page, including whether the championship of the department is displayed.
You tin can also drag and driblet the sections to change the order of how they volition appear on your published issue.
If you lot want to alter the order of sections on a per effect ground or the gild of articles within a section:
- Become to Problems and open the event yous desire to edit
- Click Order
- Drag and drop the sections and articles where you want them
- Click Done when you are finished
Preview Issue and Articles #
If you want to see what your articles will wait similar prior to publication, click on the Preview button on the Publication tab of the submission record. Users with the permission to preview will meet this button from the Copyediting stage forwards.
If you desire to see what your articles volition look like in the context of an event before publishing it, you can utilise the Outcome Preview feature:
- Click the bluish arrow next to the futurity consequence
- Click Preview
- The issue preview page will open. To preview an article, click the article title in the table of contents.
Publish Issue #
Once you are happy with the effect hit the Publish Upshot link to publish it on your periodical website.
Notify Readers #
Y'all will accept the choice to send a notification to users nigh the new issue.
To not send a notification of a new effect published, uncheck the box beside "Send notification email to all registered users" before pressing OK.
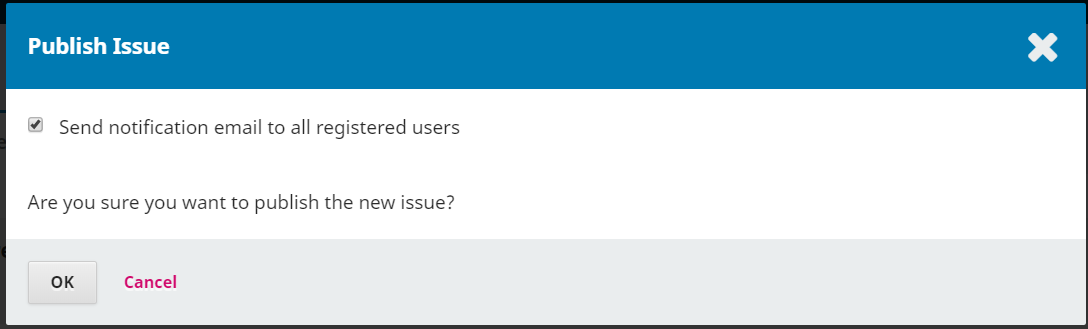
The content of the announcement is generated automatically and cannot be edited. You lot tin can alternatively use the Announcements feature to send a publication announcement with customized content.
Unpublish Outcome #
Use the Unpublish Issue link to remove the issue and all of its content from public view. The issue will revert to the Future Issues tab.
Delete Issue #
You can use the Delete link to remove the issue entirely. Non but will the effect be unpublished, the organizational structure and any issue metadata will also be removed. Any assigned manufactures will revert to their unpublished status.
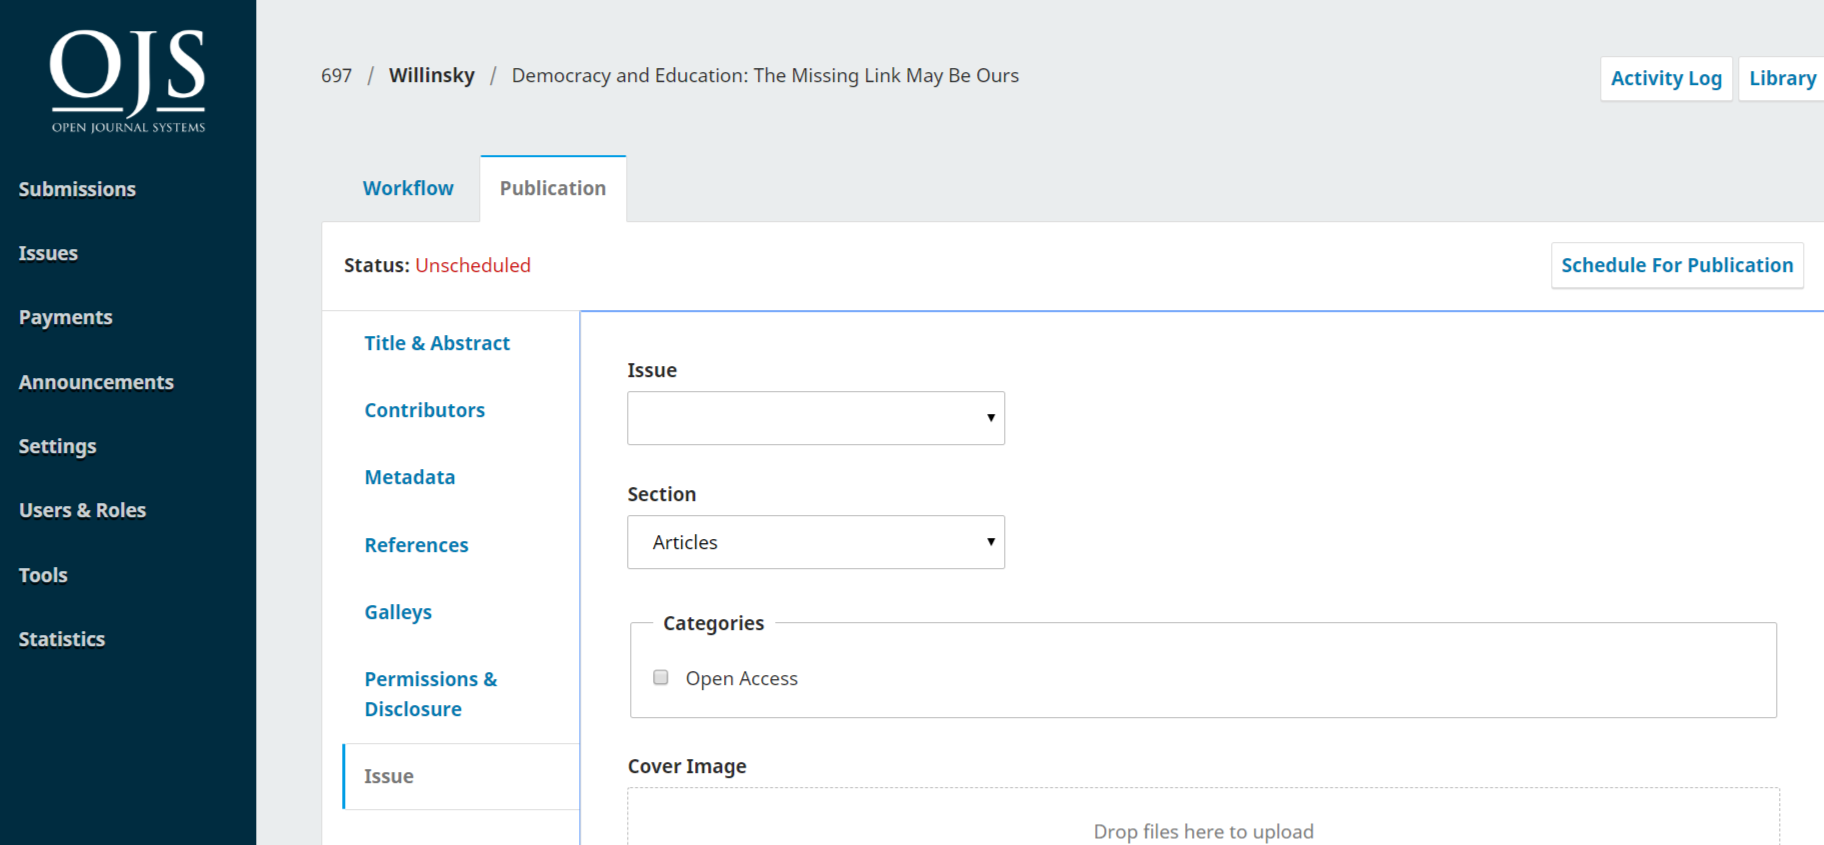
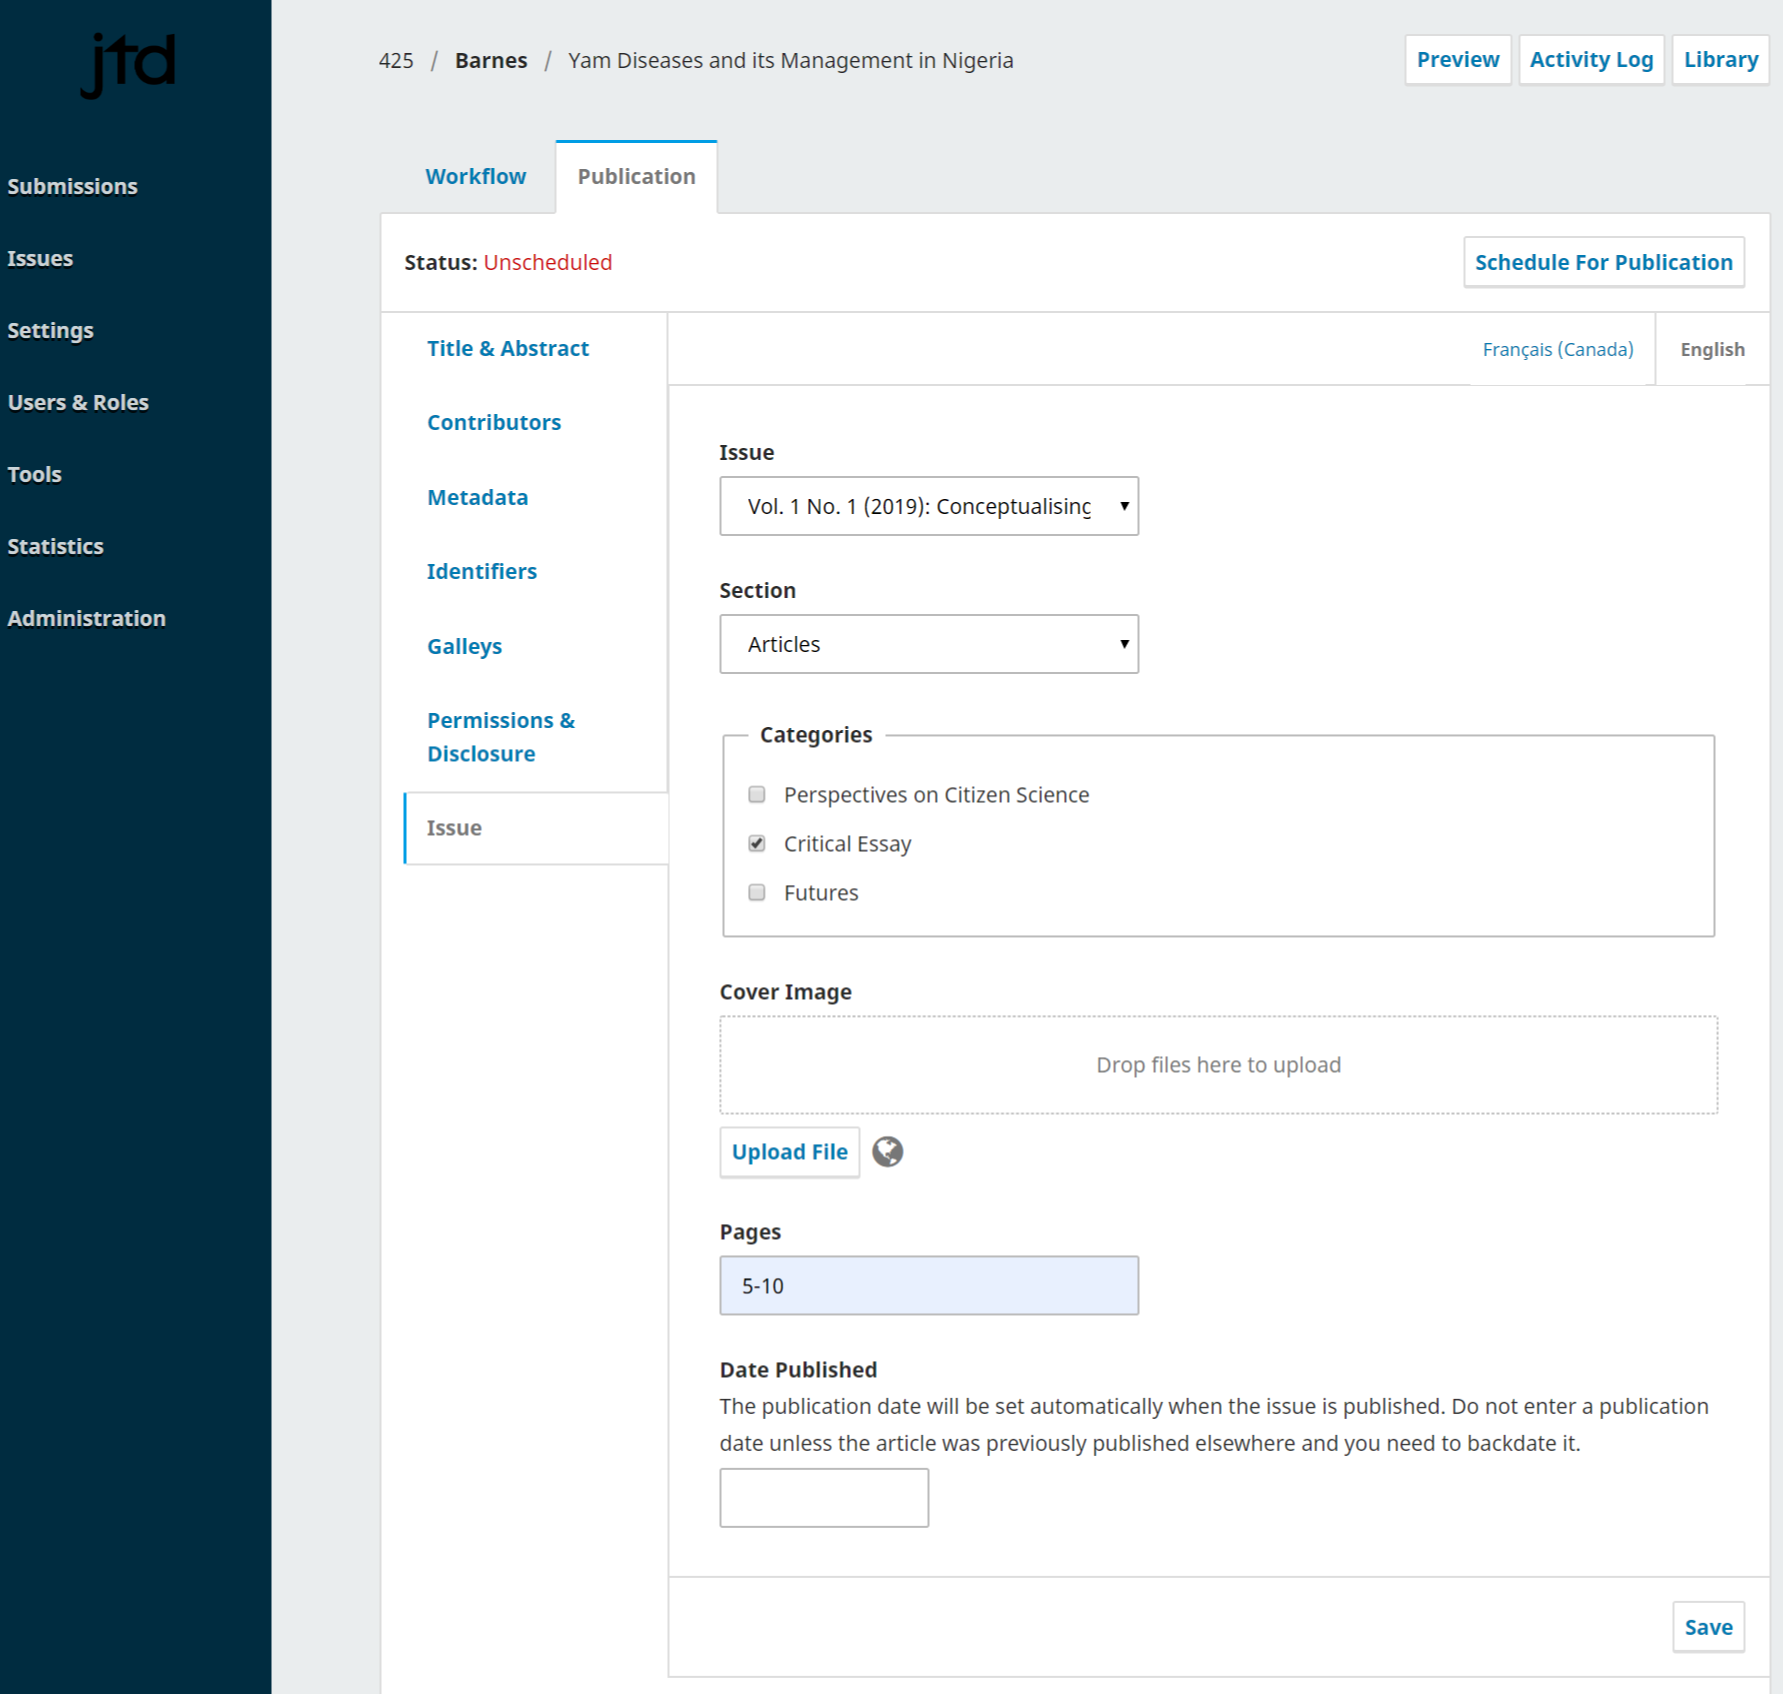
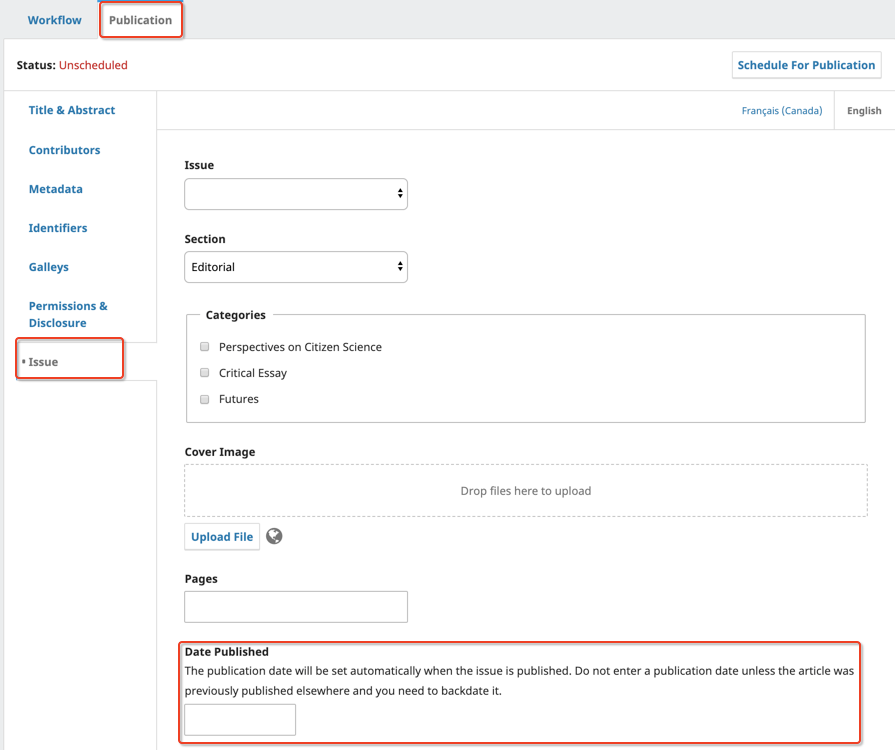
Add the Article to an Issue #
Now that you accept created an issue, you can add the article to information technology. Delight note that the article volition non be published until the issue is published. In this stride you are assigning the article to an issue.
- Go back to Submissions
- Notice and open up the submission you want to publish
- Become to the Publication tab > Issue
- In the Event field, select the issue yous want to publish the article in
- The Section volition exist filled in automatically based on the submission metadata but you lot can alter it if needed
- You can select a Category if you haven't already done and then (explained in a higher place)
- If you want an image to announced on the commodity folio, upload it under Cover Image
- You can add Page Numbers, which will exist included in the metadata and on the tabular array of contents
- Engagement Published will be fix automatically when the issue is published. Practice not enter a publication appointment unless the article was previously published elsewhere and you need to backdate it.
- Click Relieve when you are finished
Continuous Publishing #
OJS is currently designed for a traditional publishing model where articles are published in issues. However, continuous publishing is a popular alternative way to publish scholarly research, in which articles are published as they are ready. Y'all can use a continuous publishing model inside OJS.
You can create an issue with a title like "Current Publications," publish information technology, and add articles to information technology every bit they become available. The manufactures will exist published immediately on the current issue page of your site.
When the "Current Publications" upshot gets full, y'all can rename information technology with an effect number (e.g., Vol 1, Issue 2) and create a new "Current Publications" consequence for the adjacent batch of new articles.
If you would like to notify your readers when each new commodity is published, you will accept to create an individual Announcement, as the automated notification bulletin for a new publication tin only be sent when a new issue is published. Come across the Website Settings chapter for information about Announcements.
Schedule for Publication #
The next step is to schedule the article for publication. Although the commodity will non be published until the issue it is assigned to is published, the Schedule for Publication pace is the terminal stride in confirming that the commodity is ready to be published.
Simply a Journal Editor can schedule an article for publication, not a Section Editor or Guest Editor.
The commodity must have been assigned to an effect and passed the Review stage in order to be able to schedule it for publication.
When you are ready to publish the article:
- Open the submission
- Go to the Publication tab
- Click the bluish Schedule for Publication button.
A bulletin will popular up that confirms you want to schedule the article for publication. Click Publish.
Schedule for Individual Publications #
In previous versions of OJS, an article would exist assigned to an issue and would be published when that issue was published. In OJS three.2, information technology is now possible to prepare a specific publication date for each publication.
To do this, under the Publication tab of the manuscript, go to Problems.
Under Date Published you tin enter the publication date if it is different from the issue publication date. If not, leave this blank.
In club to schedule an individual publication, information technology must be assigned to an issue and have passed the review phase.
If the date is prepare to a futurity appointment, the publication should be published when the scheduled task runs for that date.
If the scheduled manuscript is unscheduled from the consequence, the previously scheduled date should non modify.
Versioning of Articles #
An power to publish versions of articles is one of the major new features in OJS 3.2. This feature supports preprint publication and publishing new versions of articles when a correction or significant change has been made. With the versioning feature you tin can manage unlike versions of an commodity and clearly indicate which is the nigh current.
One time an commodity is published, neither metadata nor galleys tin can be edited. When a revision of a published article or metadata is necessary, it can be done in 1 of two ways:

Pick i: Unpublish and republish
Unpublishing an commodity allows yous to make changes without creating a new version. Afterwards unpublishing, you lot can update metadata and/or replace the galley file and schedule the article for publication once again. If scheduled into a published outcome, it will become bachelor right abroad. No notification will be sent to readers, since the notification is sent when an issue is published, non for an individual article.
Option 2: Create new version
When creating a new version, you lot volition be able to make changes to the metadata and/or galley files. Make sure to click Salve on the bottom right to record the changes.
You can keep track of version updates under All Versions. Each version is marked by a number and date published. The version currently being updated is marked by a number and Unpublished.
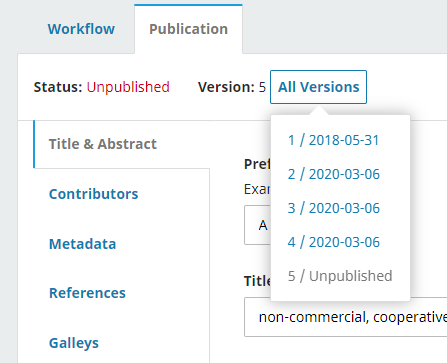
Once your changes are completed, you can publish the new version by clicking Publish on the top right. If scheduled into a published issue, it will get available right away. No notification will exist sent to readers since the notification is sent when an issue is published, non for an private commodity.
The list of prior versions and update dates will be listed on the published article page.
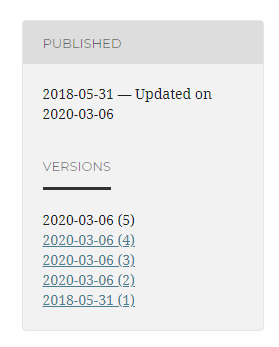
Readers will be able to access previous versions. They will see a message on the article and galley pages advising them that it is an outdated version and pointing them to the most recent version.
Example of an outdated version message on the article page:

Case of an outdated version bulletin on the PDF galley folio:

The article URL volition always point to the nigh recent version, with earlier versions being available at the aforementioned URL with the version at the cease of the URL (eastward.g. /version/1234/).
DOIs and Indexing of Versions #
Where a DOI was assigned to the original version, it will not exist changed automatically. Previously deposited CrossRef metadata will not be automatically updated. If article metadata was changed, we recommend updating CrossRef metadata in the CrossRef XML Export Plugin by manually depositing the updated article. For instructions on how to manually deposit an article meet the PKP'due south CrossRef Plugin Guide - Manual Deposits.
Indexing services and repositories that use OAI to harvest metadata will need to harvest the commodity metadata once more in order to update to the new version.
The new version will exist tagged properly to be recognized and updated by Google Scholar's alphabetize, but the harvester will demand to visit your site once more in order to observe the new version.
Information technology is best to bank check with a particular repository or alphabetize to learn what their process is and what they require.
Source: https://docs.pkp.sfu.ca/learning-ojs/en/production-publication
0 Response to "Open Scholar Upload Image Unable to Process Request"
Post a Comment